
This post will discuss the various features associated with layers.
Layers Overview
Each layer consists of a RGB image, an alpha channel, and a Bezier path frame. The RGB image is a raster frame buffer that you paint into. The associated alpha channel can act as an integral mask. The Bezier path frame stores Bezier paths associate with the layer. If the layer is a movie layer then it also contains a reference to it’s associated movie file.
You can have as many layers as you wish, but be aware that each additional layer takes up system memory. Each layer has an associated name, status, compositing option, and transparency option.
The canvas can be viewed in 2 different modes. They are the ‘View All’ and ‘Current Layer’ view modes. The Current Layer view mode only displays the current layer. The View All mode displays the entire composted layer stack.

You can switch between view modes by using the view icon popup in the main operation toolbar. Or you can use the View All menu flag in the main Canvas : Layer menu to toggle between the 2 different view modes. This menu flag also has an associated menu command key.
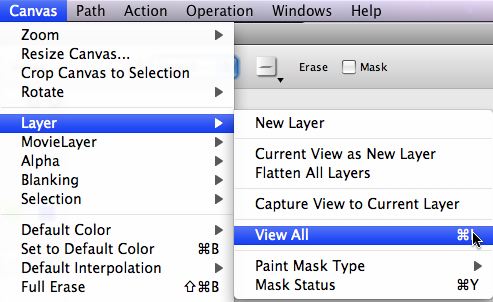
A layer’s status, composite, and transparency settings will only be active if the canvas is being viewed in ‘View All’ mode. If a layer’s status is on, then the layer will be active and used to generate the overall composited layer stack view. If the layer’s status is off, then it is muted and will not be used when computing the composited layer stack view.
Muted layers can be used as non-displayed temporary storage buffers in paint action sequences (PASeq) that use multiple layers, to store masks, to store textures, to store stereo disparity maps, or for whatever additional uses you come up with. Muted layers are displayed when in Current Layer view mode (if they are the current layer).
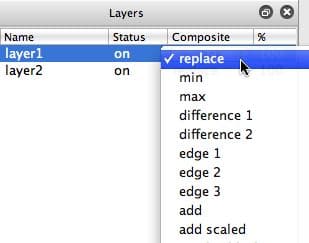
A layer’s Compositing setting refers to the particular compositing algorithm used to combine it into the accumulated view all layer stack display. A few of the different compositing options are shown in the screen snap above. Layers are composited in order from top to bottom of the layer stack list. Layers, like all list elements in Studio Artist, are always applied from top to bottom.
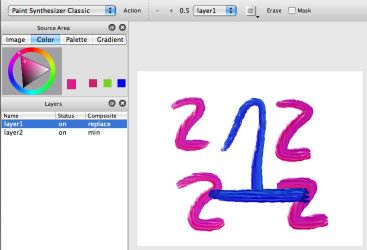
Composite refers to how the layer is algorithmically added to the layer stack view. A compositing algorithm takes 2 images as input (the layer being composited and the view being constructed) and generates a single image as output (the view being constructed). An example of min compositing in view all mode is shown below. Layer 1 contains a painted blue numeral 1, layer 2 contains 4 painted red numerals 2.
Alpha Channels
Each individual layer also contains an integral alpha channel. You can think of an alpha channel as being a mask that provides a percent coverage value for each pixel in a RGB raster image. Studio Artist has a very flexible alpha implementation. You can turn alpha compositing on or off for the layer stack by using the Canvas : Alpha : Enable for View menu flag.
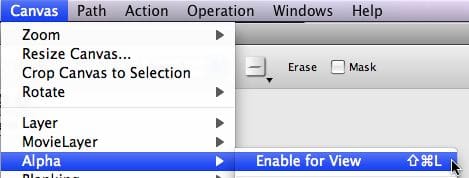
If you are just doing traditional painting or photo effect image processing you are probably better off leaving alpha compositing turned off. For more information on working with alpha in Studio Artist 4 check out this post.
Movie Layers
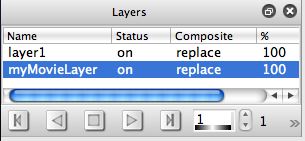
Movie layers are how you can associated movie files with specific layers in v4. You can have as many movie layers as you wish. Movie layers contain a reference to a specific movie file stored on your hard disk (as opposed to the contents of the movie being physically stored in the layer itself). You can play or move between different frames of a movie layer by using the movie transport that appears at the bottom of the Layer palette when a movie layer is the current layer.
Movie layers replace the old canvas movie feature available in previous versions of Studio Artist. The old canvas movie was a virtual layer that sat on top of the canvas layer stack, while the new Movie Layer feature allows for multiple movie files to be in different layers in the overall canvas layer stack.
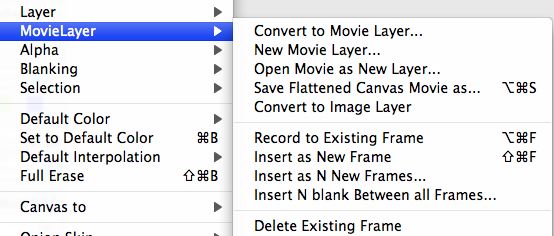
There are a number of different movie layer commands accessible in the main Canvas menu. You can overwrite record to an existing frame, insert new frames, delete frames, etc.
A movie layer contains a normal layer image buffer and a reference to it’s associated quicktime movie file. When you paint on an individual movie layer, you need to record the paint changes to the current frame before you move to a new frame, or the changes will be lost.
Editing changes made to a movie layer’s associated movie file are non-linear editing changes, where a new frame is inserted into the movie media track and an edit change is made to the video track that references the new media frame. New frames are inserted into the media track as non-compressed frames. When you are done editing a movie layer you will want to flatten the associated movie, which you can do using the Save Flattened Canvas Movie as menu command. Flattening a movie re-compresses all of it’s associated frames using the current application movie compression settings (File : Movie Codec Settings dialog).


1 Comment