Tips and Tricks Blog
Answers to Some Common Questions
This tip provides some answers to common getting started questions for beginning users of Studio Artist.
How do I set the canvas to the source image?
How do I erase the canvas to a fixed color background?
The erase button is located in the main operation toolbar, as seen in the screenshot below. This is the equivalent of the old erase button with the arrow icon.
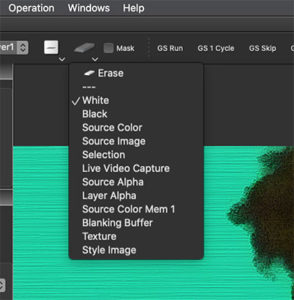
When you click on the eraser Icon on the top of the Studio Artist Interface, you will get a contextual menu with the various background options you can erase to.
You can erase the current canvas layer to a solid color or to things like the source image or a live video frame capture.
You can also just drag and drop the source image onto the canvas as a shortcut to set the current canvas layer to the source image. This is the equivalent of erasing the canvas to the Source Image.
The various erase to background options are also accessible in the main Canvas : Default Color menu.
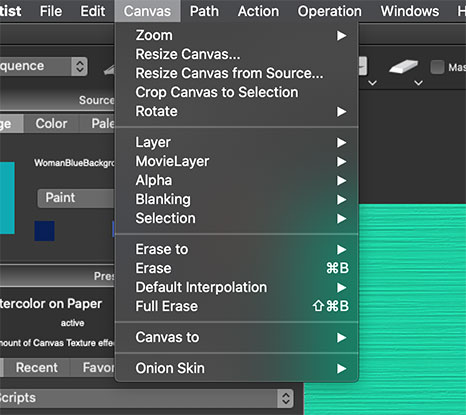
The Canvas : Set to Default Color menu command is the equivalent of pressing the Erase button in the main operation toolbar. You can use the associated cmnd b (cntrl b windows) menu hot key shortcut to erase the canvas to the current default color background setting.
The Canvas : Full Erase menu command erases the canvas to the default background color option and also erases the current layer’s Bezier path frame, blanking buffer, and alpha channel.
How do I make a new favorites category?
How do I add a preset to the current favorites category?

The preset favorites is in the toolbar and is also a preset panel toggle. Each icon in the tool bar represents a different favorites preset. Pressing the icon loads that particular preset as the current preset. You can mix and match different operation mode types in a given favorites category, so you could for example mix together image processing and paint presets in one favorites category.
You can have as many different favorites categories as you wish. You can use the popup menu with the arrow icon at the left side of the favorites toolbar to change the current favorites category.
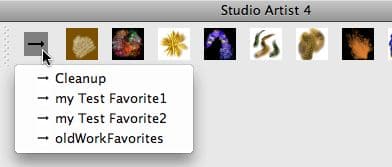
Each favorites category is stored as a folder inside the main Preset: Favorite folder in your Studio Artist folder. Any preset files located in a particular favorites category folder will show up as the associated presets for that favorites category.

To make a new favorites category you can simply make a new folder in your main Preset : Favorite folder in the Finder and name it what you want your custom favorites category to be named. Or, you can use the Edit : Preset : Make New Favorites Category menu command.
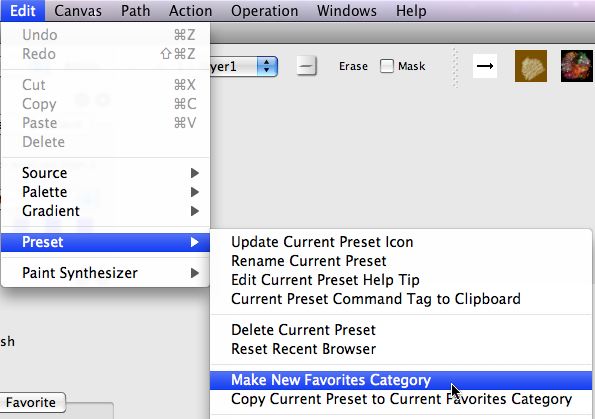
The Edit : Preset : Copy Current Preset to Current Favorites Category menu command will copy the current preset to the current favorites preset category. You can also drag and drop the current preset icon from the main preset browser to the favorites preset toolbar to do the same thing.
Favorites presets are unique in that they are only organized by category as opposed to collection – category like the operation mode presets. All of the other preset folder follow the traditional Studio Artist collection – category folder hierarchy. For example, the Finder screen shot below shows the folder hierarchy for paint presets.

Favorites presets can also be accessed in the main Preset Browser palette, as shown below.
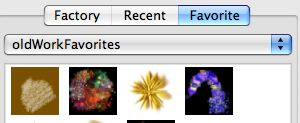
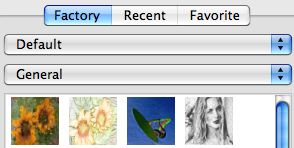
Note that when the preset browser displays the factory presets (shown below) they are organized by collection and category, as opposed to the favorites presets which are only organized by category.
How do I transfer my old custom 3.5 and 4.0 presets to version 5?
I copied my old preset folder to v4 but the old presets don’t show up
Studio Artist V5 will work with all of your old presets from version 3.5. This includes any custom presets you made yourself. It’s straightforward to copy your old custom presets over to V5.
All of the different preset types are organized by collection and category. The organization and naming of collections and their associated categories is implemented with folder naming and positioning hierarchy. So if you look at the folder hierarchy contained in the Preset folder for 3.5 you can see a number of different collection folders sitting at the top level of the Preset folder.
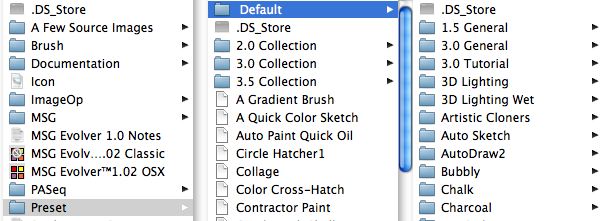
Note that there are no loose preset files in a collection folder, just it’s associated category folders. Any loose preset files in a collection folder will be ignored by Studio Artist when it displays presets in the Preset Browser. You always want to put individual preset files in a specific category folder, and category folders need to be in collection folders, and collection folders need to be in the main preset folder associated with the specific operation mode for that preset.
The screen shot below shows the preset organization in your Studio Artist folder.

The first thing to note is that the Preset folder next to the Studio Artist application contains a set of folders that are specific to each preset supported operation mode. The naming of most of these folders is similar to previous versions of Studio Artist, so image operation presets are stored in the ImageOp folder, texture synthesizer presets are stored in the TexSynth folder, etc. Paint synthesizer presets are now stored in the Paint folder.
Presets are organized by collection and category, and each preset type has it’s own specific preset folder name, all of those specific preset type folders are stored in the main Preset folder.
The Favorite folder corresponds to preset favorites. Favorites deviate from the collection – category organization, favorites just contains category folders. Favorites are discussed in much more detail earlier in this tip post in the How do i make a favorites category section.
Where’s old Canvas Movie functionality?
The old canvas movie functions available in previous versions of Studio Artist has been replaced by the new Movie Layer functionality. Movie layers are special layers that have associated movie files. You can use a movie transport available in the layers palettes to play or access specific frames in a movie layer.
The equivalent to the old File : Load Movie to Canvas menu would be to use the new File : Import : Open Movie as New Canvas Movie menu.
For more on working with Movie Layers check out this tip.
Where’s the old Layer Source Keyframes?
Where’s the old Layer Content Keyframes?
Where’s the old Layer Bezier Keyframes?
Where’s the old Layer Timeline?
The old Layer Timeline functionality available in previous versions of Studio Artist has been integrated into the Paint Action Sequence (PASeq)Timeline in v4. You can use PASeq Context action steps to implement everything you could do in the old Layer Timeline.
Here’s a tip that discusses this change in more detail.
This pen mode control is the Pen Mode control panel in the paint synthesizer Editor as seen below.
