Paint Action Sequences (PASeq) are the heart and soul of Studio Artist. Studio Artist is built around using PASeq’s instead of layers. Studio Artist does provide layers as well, but using PASeq’s is often much more powerful and much easier to use than layers.
Paint Action Sequences are used to combine together presets into a script as a way to build up complex images, much like you would with layers. You can combine both PASeq’s and layers as well.
With PASeqs can record all of your individual manual or automatic painting steps, which can then be edited or adjusted and then replayed into a new blank canvas.
PASeqs are used to create auto-rotoscoping and movies effects. This tutorial will focus on explaining how to work with paint action sequences.
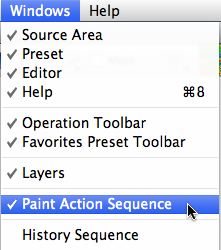
The Paint Action Sequence window is where you record and edit a PASeq. Like all Studio Artist windows (also referred to as palettes), it can either be docked in the main workspace, or used as a floating palette. You can display or hide the paint action sequence window using the associated menu in the main Window menu.
The Paint Action Sequence window is composed of 3 main parts. There’s an integrated toolbar at the top of the PASeq window that contains a series of individual controls associated with playing and recording a PASeq.
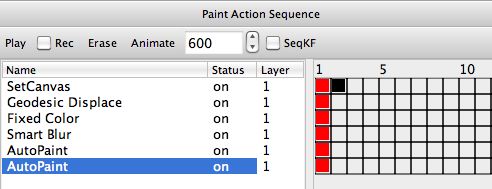
Below the PASeq integrated toolbar is the main PASeq action step list (left side), and it’s associated keyframe timeline (right). A PASeq is composed of a series of individual action steps. Each action step represents some action you can manually or automatically run in Studio Artist. A manual action could be anything from a manually drawn paint stroke to an interactive warp to an interactive adjustment. An automatic action could be an image processing effect, or an auto-paint step, or anything run by pressing the main Action button.
Each individual action step is displayed with an associated name, status, and layer indicator. You can adjust the positioning of their associated column displays in the action step list by dragging the list header boundaries to reposition the associated vertical columns in the list.
The status display indicates whether the associated action step will play (on) or not (off) when the PASeq is played. So, to mute an individual action step, turn it’s associated status control off. If an action step is muted then it doesn’t run when the PASeq is played. Muting an action step is useful to turn it off but still keep it in the list as a placeholder.
You can edit an action step’s name or status by double clicking on it’s display and then adjusting the activated text edit or popup control. The action step’s layer control cannot be directly edited, but will update accordingly if you run the interface to action step context menu. This menu will be discussed in more detail in the context menu commands section.
Recording a PASeq
To record a new PASeq, click on the Rec checkbox at the top of the PAseq window. This activates PASeq recording. Any individual manual or automatic actions you perform in Studio Artist will be recorded as individual action steps in the PASeq action list if PASeq recording is turned on.
For example, if we turn on PASeq recording, erase the canvas to white, and then paint a single paint strokes in the canvas, we will record the 2 action steps shown below.

The first action step named ‘SetCanvas -white’ erases the canvas to white. The second action step named ‘Interactive Multi Pen’ is associated with the single paint stroke we painted (using the ‘default : general : a gradient brush’ paint preset). Note that the name of the paint preset we used for the painting is also tagged onto the name of the recorded action step. As long as the preset we are using is active (unedited) this additional preset name tagging will take place. If we modify or edit the current preset, then the preset name is not added onto a recorded action step (since the preset is no longer active but has been edited and hence no longer specifically corresponds to the original preset file stored on your harddisk).
To play your new recorded PASeq, first turn off recording by unclicking the Rec checkbox. Then press the Play button at the top of the PASeq window.
To delete a specific action step, just select it by clicking on it and then press the delete key. To erase the entire PASeq action step list, just press the Erase button at the top of the PASeq window.
PASeq Keyframe Timeline
Each action step has an associated set of individual keyframes that are displayed in the PASeq keyframe timeline (on the right side of the PASeq window). The action step list and the keyframe timeline are separated by a vertical splitter control, which can be adjusted to determine the positioning the of the 2 component views. If you drag the splitter all the way to the right side of the PASeq window, then the keyframe timeline will be hidden from view. You can always mouse down in the vertical splitter and adjust the positioning of the action list and the keyframe timeline based on your current workflow. If you aren’t working to build an animation you might want to hide the timeline display for clarity when working.
Each action step has a horizontal row of individual keyframes. There’s a numeric control in the integrated PASeq toolbar at the top of the PASeq window that can be used to specify the # of keyframes in an animation. Each vertical column in the timeline represents a specific frame time in an animation. The horizontal strip at the very top of the PASeq timeline is a frame header that displays the associated frame times of the vertical columns. Clicking on the frame header will adjust the current time to that frame time.
To play a keyframe associated with a specific action step, just click on the appropriate keyframe cell at the frame time you are interested in playing back. Playing a PASeq keyframe both resets the associated operation mode Editor controls to the settings recorded in the action step keyframe as well as runs the specific action associated with the action step’s operation mode.
A recorded keyframe is displayed with a red interior. To record a specific keyframe, just option click on the keyframe. To erase a recorded keyframe, just hold down the command key and click the red recorded keyframe and it will be removed. The first keyframe for each action step must always be recorded, so you can’t erase it to be empty. But the first keyframe can be a mute keyframe if you don’t want it to playback at frame 1.
A muted keyframe is displayed with a black interior. To record a mute keyframe, hold down the m and option keys and then click the keyframe. When an action step is muted at a specific frame time, then it won’t playback in an animation until the next active recorded keyframe (a red one) is reached.
Parameter values associated with 2 red recorded keyframes for a particular action step will interpolate for frame times between the 2 recorded keyframes. This is true for editable parameters that can be adjusted in the Editor window for the action step. It’s also true for any recorded path information associated with an action step.
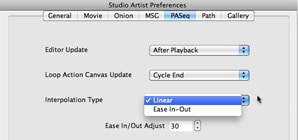
Keyframe interpolation is generated using a linear interpolation algorithm, However, you can adjust additional ease in and ease out PASeq preference parameters for keyframe interpolation if you want the interpolation to be nonlinear.
Here’s a simple example of using PASeq timeline keyframe to build a paint animation based on path interpolation. The variation on the initial PASeq we used for recording a single manually interpolated patin stroke is shown below.

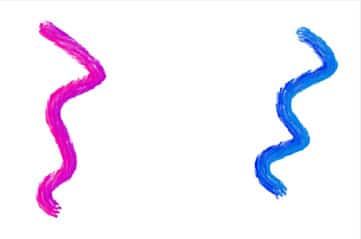
I generated this modified PASeq by painting a second paint path with a different source color, and then option clicking the keyframe at frame 10 for my interactive multipen action step to record the second keyframe for that action step. My original paint stroke was a vertical stroke drawn on the left side of the canvas. My second paint stroke keyframed at frame 10 was drawn on the right side of the canvas with a blue source color (as shown below).
Note that i have the PASeq controls setup for a max of 10 frames in my keyframe timeline. I erase the canvas to white in the first action step at frame time 1 and then mute that step for the remaining frames in the animation. This is followed by a single interactive multi pen manual paint step that has 2 keyframes, at frame time 1 and frame time 10. If i press the Animate button art the top of the PASeq window i get the following generated canvas image.
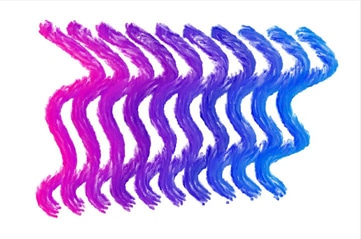
The animation over 10 frames recreates the first manually drawn paint path at frame 1,and the final manually drawn paint path at frame 10. Additional interpolated paths are drawn for the intermediate frame times. Both the path shape and the path color are interpolated for the intermediate frame times.
If i wanted to create an animation output where the paint path appeared to move over the course of the animation without seeing the previous painted strokes in the current frame i would not incorporate a mute step in the first erase to white action step.
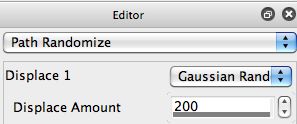
I could also interpolate any Editor parameters associated with the paint preset i used for the interpolated manually drawn paint path. For example, i could have edited the path randomization of the paint preset before drawing the paint path associated with the second keyframe at frame time 10. I did this by going to the Path Randomize control panel in the paint synthesizer and changing the Displace Amount option from 3 to 200 as shown below. This editing change in the paint synthesizer creates a more randomized dispersed paint path.
I then repainted my paint stroke on the right side of the canvas and option clicked the existing keyframe at frame time 10 for the interactive multipen action step. If i run the animation with this modified PASeq the result is shown below. Note how the path randomization of the manually drawn paint stroke is interpolated over time in addition to the path shape and coloring.
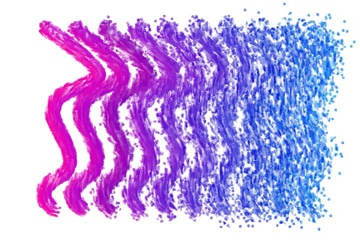
In the example above we only interpolated one of the editable parameters in the paint synthesizer over time. But we could have interpolated multiple parameter values in our single action step at the same time if we wanted to.
PASeq keyframing and PASeq recording in general works like snapshot automation (if you are familiar with audio mixer terminology). What the term snapshot refers to is that the entire set of interface parameters associated with a particular effect operation type is recorded in a single PASeq action step. And interpolation between individual keyframe cells in an action step also occurs across the entire range of available parameters. As opposed to other potential keyframe interpolation schemes where each individual parameter has it’s own individual horizontal keyframe track over time.
Context Menu Commands
There are a set of individual context menu commands that can be run on specific selected action steps in a PASeq. To select a particular action step, just mouse down in it.
On a mac if you hold down the control key while mousing down on an action step then a contextual menu will appear with a series of context commands that can be run on the selected action step. On windows this is equivalent to clicking while holding down the right mouse button.
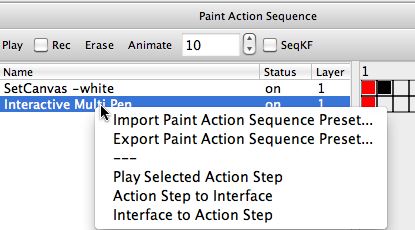
There are contextual menus to play the selected action step, or just set the interface controls to what is recorded in the action step (action step to interface), or overwrite the recorded action step with the current interface parameter settings (interface to action step).
There are also additional contextual menu shortcuts to import or export a PASeq preset.
PASeq Presets
Presets are pre-built Studio Artist effects that are stored in individual preset files on your hard disk. Synthetik provides a large set of factory presets, and you can also record or edit your own personalized presets. Paint Action Sequences have their own specific Studio Artist preset type. You can use the factory preset browser to navigate the different factory PASeq preset collections and categories when in Paint Action Sequence operation mode. Loading a specific factory PASeq preset file will overwrite the existing contents of the PASeq window with what is stored in the selected PASeq preset file.
The main Action button will run the current PASeq when in Paint Action Sequence operation mode.
For more information on working with presets and the preset browser check out this tip.
Context Action Steps
Context action steps are additional PASeq features that allow for some advanced processing capabilities. You can use context action steps to associate specific source images with a PASeq, associate unique background images with specific processing layers, associate sets of bezier paths with specific layers, and perform warps, morphs or adaptive filtering operations based on the movement of sets of bezier paths.
For more information on PASeq Context Action Steps check out this tip.
History Sequences
Studio Artist includes a History Sequence window in addition to the PASeq window. A history sequence is basically the same as a PASeq, but minus the keyframe timeline. The file format for PASeq presets and history sequence presets are the same, so you can open a history sequence in the PASeq window and vice versa.
Typically you use the history sequence to record an editable history of what you are doing in Studio Artist. So the history sequence can be used as a form of replayable undo. And you use the PASeq window to load or build PASeq presets, process movie files, or generate animations. But you can also use the history sequence as a way to build new effects from multiple PASeq presets, or as a placeholder for storing multiple action steps while editing a PASeq effect.
You can drag and drop individual action steps from a PASeq to a history sequence (and vice versa). There are also menu commands under the main Action menu for copy replace and append between the 2 different sequences.
Movie Processing
Paint Action Sequences are the mechanism used in Studio Artist to process movie files. To process a movie with a particular effect, you first record the desired effect in a PASeq. Or you can load a prebuilt PASeq preset if the effect you want already exists as a PASeq preset. You then run the appropriate Action : Process with Paint Action Sequence menu command to process the movie file.
You can also use a PASeq to generate animation output without necessarily processing a source movie file. You can use the Action : Animate with Paint Action Sequence menu commands to do this. Movie Streams would also be another way to generate animation from a PASeq.
There are a number of other tip posts that discuss processing movie fields with PASeqs in much more detail. Some additional tip links are mentioned below.
For More Information
There are several user adjustable parameter options available for individual PASeq presets that determine whether they playback the original state of workspace attributes like masking or layer indexing. These PASeq parameters can be adjusted in the generic Editor window when in PASeq operation mode. A tip with more information on PASeq Editor Options is available here.
There are several PASeq preference options that control how and when PASeq playback updates the Editor and canvas. There’s also PASeq preference options for controlling keyframe interpolation as discussed above. For more information on working with the PASeq preference options checkout this tip.
An introductory tutorial tip that discusses how to build a PASeq to process movie file with a single image operation effect is available here. An additional introductory tutorial on processing a movie file with a PASeq is available here.
Building more elaborate movie processing effects involves designing an appropriate paint strategy to create a particular aesthetic effect and then implementing it in a recorded PASeq. There’s a multi-part tutorial series that details how to build movie processing paint strategies available here.
Studio Artist PASeq keyframe interpolation includes the ability to interpolate collections of multiple bezier paths. What this means is that you could interpolate all of the multiple paths associated with a complete painting to a new painting using a single PASeq action step. This approach is called working with interpolating encapsulated bezier paths. A tutorial tip that discusses working with encapsulated bezier keyframes to build paint animation is available here. Multi-step paint animations can be generated automatically using the techniques discussed in this tip.
For more information on PASeq Context Action Steps check out this tip. A more detailed tutorial on working with morph contexts for generating morph animation effects is available here.
For more information on configuring the Studio Artist workspace check out this tip.


3 Comments