Time Particles provide a way for individual paint strokes painted by the paint synthesizer to have temporal continuity in an animation. Temporal continuity means that the individual paint strokes are present across multiple sequential frames as the animation progresses. The individual paint strokes associated with the time particles can have their own movement that is occurring over time, and is independent to any individual path regeneration for the paint stroke itself.
If a paint stroke length of 1 is used for time particles then an individual particle will be a single paint nib moving in time. If the paint stroke has a length greater than 1 than a complete paint stroke will be associated with each time particle. Depending on the settings of the time particle parameters in the paint synthesizer, a rigid paint stroke may move in time or the moving paint stroke may also be recalculated and redrawn in each new frame.
The movie example ‘motion-drops1’ shown in the link below shows off a simple use of time particles in a paint animation.
This example was create using a 2 step Paint Action Sequence (PASeq) that will be detailed below.
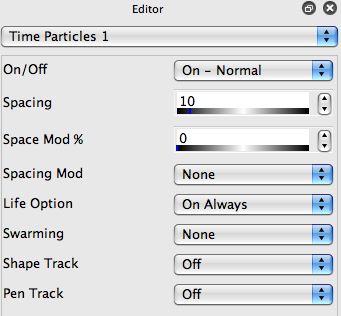
A simple paint preset was edited to turn on time particles as shown below in the Time Particles 1 control panel in the paint synthesizer.
The movement of the individual time particles over time is primarily defined by the editable parameters in the Time Particles 2 control panel in the paint synthesizer. The settings shown below were chosen so that the individual time particles would vertically drop and then bounce back up when they ran into the bottom of the canvas.
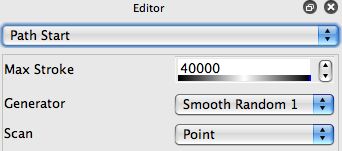
The number of time particles used in an animation is determined by the Max Stroke parameter in the Path Start control panel. All of the normal Path Start controls are used for the first frame of the animation, and will determine the initial start points of the individual paint strokes and hence the time particles themselves. All of the Path Start settings are ignored in subsequent frames of the animation.
A common editing mistake is to turn on time particles wihtout setting a reasonable value for the Max Strokes parameter setting. Many Studio Artist factory presets default with a max strokes setting of 40000. This is done so that when the action button is pressed the paint synthesizer will continue to draw for an indefinite time until a user manually stops action painting by pressing the space bar. 40000 time particles is an exceedingly large number of particles and each frame in an animation with this many particles would take a long time to render. 40 to 400 time particles are probably more reasonable numbers for a typical time particle paint animation. So remember to edit the Max Stroke parameter in the Path Start control panel with an appropriate # of particles before you build a PASeq or start an animation with time particles.
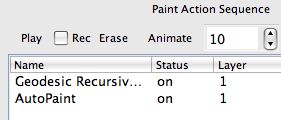
The screen snap below shows the 2 step PASeq used to create the motion-drops1 example.
The first action step used in the PASeq was created using the Geodesic Recursive Growth Image Operation. This action step processes the canvas with the feathering effect created by this particular Ip Op. The second action step is the AutoPaint paint synthesizer step that paints with the time particles. Note that the canvas background is not erased as the animation progresses, so each new output frame is created by painting on top of a feathered version of the previous output frame.
Real Time Preview and Live Performance Using Time Particles
You can perform live parameter edits while the Studio Artist 4 paint synthesizer is running. This means that you have the ability to preview time particle behavior in real time and make editing changes while the time particles are moving. This can be a great aid to understanding how the individual time particle parameters control the particle movement over time.
Time Particles could also be used as an element of a live visual performance. Live performance could mean a live visual display projected to a live audience or an interactive visual performance streamed into a quicktime movie for later display. The later allows you to interactively work with presets that may render slightly out of real time but end up with a final rendered movie that plays at the speed you want for your final visual presentation or performance.
The key to time particle preview or to live visual performance using time particles is to use Loop Action. Loop Action is a new feature in Studio Artist 4. It allows you to seamlessly loop any individual action. To start Loop Action, just run the Action : Run Loop Action menu command.
Once you have a paint preset that uses time particles running in loop action, you will be able to see the time particle animation proceed in real time as the action loops over and over again. You can then edit the individual time particle parameter controls (or any other paint synthesizer editable parameters) and observe how they influence the time particle movements and overall paint effects respectively.
Live Pen Tracking
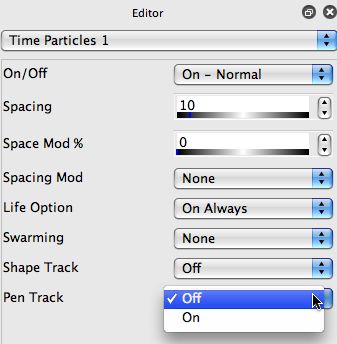
Pen Track is a new parameter available in the Time Particle control panel. When turned on, the time particles will be attracted to the current pen position when the pen is in proximity. This is a useful way to interactively control and influence time particle positioning and behavior in a progressing animation.
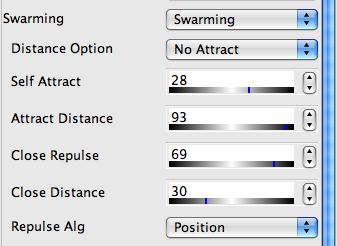
Pen Track works well when combined with particle Swarming. When Swarming is turned on there are additional parameters available that let you specify how individual particles attract or repulse. Think of the movement of individual birds or insects in an overall swarm and you’ll have an intuitive feel for the behavior of a swarm of particles.
Just like in nature, a few simple rules to define the behavior of individual objects in a swarm can lead to highly complex movement effects over time. For example, Close Repulsion in a swarm can keep individual particles from getting too close to each other while they are attracted to the pen with Pen Track on. This can lead to chaotic circling movement where the individual particles swarm around the current pen position. Lifting the pen out of proximity can cause the particles to then fly apart until the pen is again brought into proximity, at which point the particles will again move towards the current pen position.
The link below shows off an example of live visual performance using time particles. By working with the pen and pen proximity as loop action animation was progressing i was able to interactively influence and somewhat control the movement of the individual time particles. Because of the interaction of the swarming and border bounce parameters each particle also has a mind of it’s own in the loop action animation.
time particle live performance example
The live interactive performance was spooled into an open movie stream while loop action was progressing. I setup the movie stream frame write menu options to turn on ‘Enable Write on Op End’. For a single preset that is running in loop action this means that whenever the action ends in one cycle of the loop a frame is written out into the open movie stream. If you are running multiple actions recorded as individual steps in a PASeq as a loop action, then you could use the ‘Enable Write on PASeq Cycle’ menu check option so that a single frame would be written out into the open movie stream every time the PASeq completed one cycle in the loop action.
When i wanted to end the animation i just pressed the space bar to stop loop action. I then closed the open movie stream and had a finished movie file of the time particle animation.
Fracturing a Source Image
Time Particles can reference their original start point locations as they move in an animation. This can be used to create animation effects that fracture an image apart (or vice versa). The way to do this is to use the Time Particle Start Point Tracking option in the Paint Source Offset control panel. A simple example of this kind of effect is shown below.
fractured source image animation example
The Paint Source Offset controls in the paint synthesizer modulate the mapping between the spatial location of a paint stroke and the spatial reference for that canvas location in the source image. The Time Particle Start Point Tracking option means that no matter where a time particle moves in the canvas it will always reference it’s first frame source location.
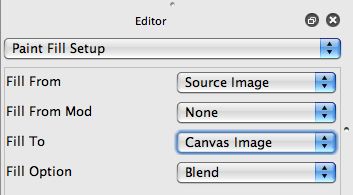
To pass through the source image with no additional processing when painting, the following Paint Fill Setup parameters were used.
A Rectangular Grid Path Start Generator was used, so the first frame’s time particles were positioned on a grid spaced to fully cover the canvas. In subsequent frames they move based on the time path created by the Time Particle parameters in the paint synthesizer. A Polar Path Angle was chosen for the time particle movement to move the time particle paint nibs away from the center towards the edges of the canvas over time.
Movie Brush Time Particles
A source movie brush can be used with time particle settings turned on. The source movie brush can either be configured to generate photo mosaic style imagery or to encode N smaller movie files that playback as the time particles animate over time. So time particles can be moving in an animation while the movie associated with each time particle is animating it’s playback with the brush nib as well.
This first example was created with a graffiti movie brush. The source movie brush settings were configured to create a photo mosaic effect. The animation was created by processing a movie file loaded in the source palette with a time particle paint synthesizer preset that used a different graffiti source movie brush to create the moving photo mosaic.
graffiti movie brush moving photo mosaic effect
This second example shows of movie source brush time particles that are configured so that different movie files play back in the time particles themselves. You could also process another loaded source movie file with this kind of effect like in the last example if you wanted to make a moving movie mosaic. However, in this example we just see the movement of the time particles as they play back individual movies within their circular paint nibs.
time particles playing back multiple movie files
Self-Animating Bezier Paths as Time Particles
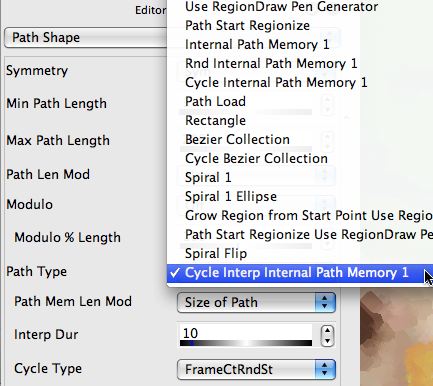
The paint synthesizer has the ability to encapsulate a set of bezier paths in it’s internal bezier path memory located in the Path Shape control panel. Version 4 has a new feature that enables you to use the individual bezier paths as key frames in an animation. When used with time particles this give the time particles the ability to self animate their shape over time in an animation.
A simple example of this is shown below.
self animating bezier path example
A series of bezier paths were hand drawn to define keyframes for an undulating jellyfish. This hand drawn bezier path frame was then recored in the paint synthesizer’s internal bezier path frame memory. The Path Shape settings used to do this kind of embedded bezier path shape animation are shown below.

