Studio Artist includes a large number of different image operation effects that are raster image processing effects. However, you can use Studio Artist’s Vectorizer to generate vector output from a raster image processing effect. Studio Artist can output EPS, SVG, and PDF vector files. This tutorial will run through the steps necessary to convert a raster image processing effect into a vector output effect preset that allows for resolution independent printing or import into a vector editing program like Adobe Illustrator.
Many of Studio Artist’s paint and image processing effects are raster effects. What this means is that they are pixel based. Raster paint and raster image processing effects are capable of generating amazing organic paint looks and photo realistic imaging effects. However, because raster image processing is pixel based you can’t arbitrarily scale raster image output to arbitrary print resolutions without interpolating the raster image, which can introduce interpolation artifacts at high interpolation ratios.
Vector graphic effects are inherently resolution independent, which means that vector file output can be printed at arbitrary resolutions with no interpolation artifacts. Studio Artist does have the capability to output vector file formats like EPS or SVG. Studio Artist also includes tools that can convert a raster image into a resolution independent vector representation. So you can take a raster image processing effect and by working in Studio Artist generate a modified version of the effect that outputs vector files, which can then be used for resolution independent printing or vector editing.
Raster to vector conversion does introduce artifacts when a continuous tone raster image is converted into a flat color region vector file. However, there are a large number of raster image processing effects that generate flat color raster output. These kinds of image processing effects are ideal for conversion to vector output.
The Vectorizer has a special Technique option called Flat Input that is specifically designed to take a flat color raster image and convert it into a vector representation. We will utilize that vectorizer technique in this tutorial tip.
The specific image operation we’ll be working with for this tutorial is the Line Screen Regionize ip op. This image operation effects is raster in nature, but generates flat color effected output. The effect is designed to simulate different black and white or color lithography and screen print styles. It’s an example of a raster processing effect that is ideal for generating vector output.
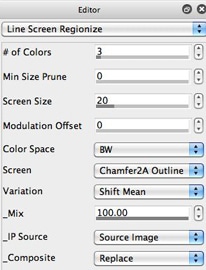
The screen snap above shows the particular editable parameter settings we used for the Line Screen Regionize ip op. Note that the Ip Source is set to the Source Image and the Composite option is set to Replace, so the effect processes the source image and then places the effected output in the current canvas layer. The effect output is shown below.
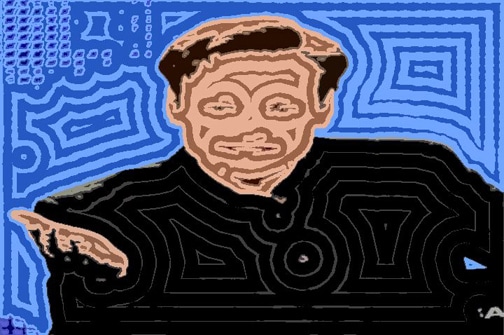
Note that the effect is ideal for generating vector output because it is a flat color stylized representation of the source image. To convert the raster frame buffer into a vector representation we can now use the Vectorizer.
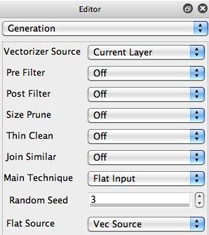
The screen shot above shows the vectorizer Generation control panel settings we used to convert out flat color raster image processing effect into vector output. Note that the Main Technique option is set to Flat Input. This particular technique assumes that you already have a flat color raster source image. If you are working with a continuous tone raster source image then you would use a different technique like the Image technique.
Note that all of the Filtering and Cleanup options are turned off. This is because we want to convert the flat color raster image into a vector representation with as little modification as possible.
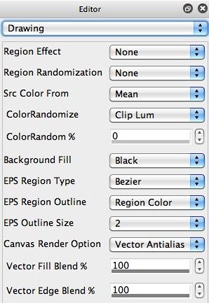
The screen snap above shows the vectorizer Drawing control panel settings used for this example. These settings basically just pass through the flat color region’s original coloring and shape with no effected variation.
Again, the point of these particular vectorizer parameter options is to modify the original image as little as possible. You do have the option to turn on any of the various stylization or coloring options and add additional modifications to your original effect.

I recorded the 2 processing steps discussed above into a paint action sequence (PASeq) shown above. The first action step runs the raster image processing effect. The second action step converts the raster effect output into a vector representation. This 2 step PASeq can now be saved as a PASeq preset and used in the future to generate our custom vector processing effect.
Note that the particular vectorizer settings we used generate anti-aliased vector drawing, so even if you wanted to output a raster image file, using this 2 step technique is a great way to convert the Line Screen Regionize effect into something that generates anti-aliased output at edges in the effect.
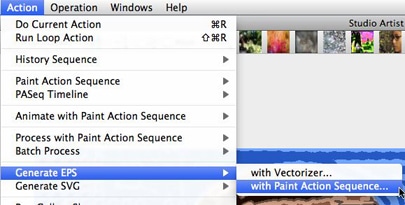
When you are ready to generate vector file output with the PASeq preset, there are a few options available to choose from. You can generate EPS output or SVG output. To do this use the appropriate Action : Generate EPS or Action : Generate SVG menu option. Since we’re working with a complete effect recorded into a PASeq, you would use the ‘with Paint Action Sequence’ menu command option.
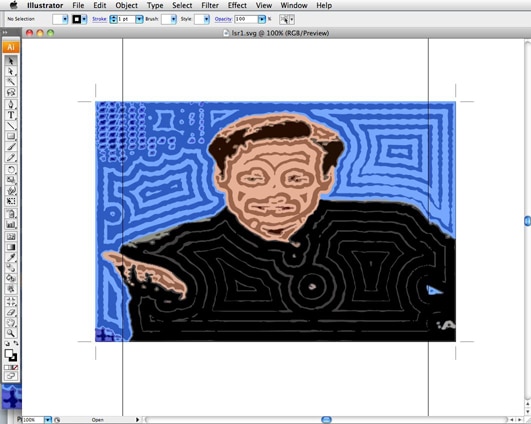
The screen snap above shows the resulting vector file output opened into Adobe Illustrator. All of the vector paths are completely editable in Illustrator or any other vector editing program when you output your effect this way.
For this particular example we output an SVG vector file and opened it in Illlustrator. Illustrator will also open an EPS vector file. Photoshop can also open EPS files and rasterize them into very high resolution image layers.
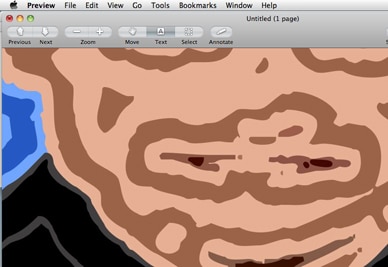
The screen capture above shows a zoomed in view of the EPS vector file in Apple’s Preview application. Note how the vector file output arbitrarily scales to an arbitrary zoom for display or for printing.
For More Information
Here’s a tip on generating EPS vector output.
Here’s a tip on generating SVG vector output.
Here’s a tip that discusses a different approach to generating vector output effects by using the Sketch Ip Op in conjunction with the paint synthesizer vector output capabilities.
The PASeq preset generated in this tutorial is available for download here.


