This tutorial continues our discussion of the mechanics of designing and building paint strategies for creating paint animation effects in Studio Artist.
To process a movie file in Studio Artist you first record a Paint Action Sequence (PASeq) and then process a movie file with the PASeq. A paint strategy is the series of processing steps you need to implement in your PASeq to build up a particular visual effect.
This discussion will focus on some technique to construct cartoon style auto-rotoscope animation effects. What we mean by auto-rotoscope is that you work with one frame of a movie to build up a particular stylistic paint effect encapsulated in a PASeq preset and then Studio Artist automatically paints the rest of the frames in the visual effect style you created in your custom PASeq.
Here’s an example of a finished cartoon style animation effect generated by processing a source movie with a PASeq. The Vectorizer was used to generate this particular stylistic effect.
Studio Artist has the capability to create a wide range of different stylistic cartoon effects. In this tutorial we’ll discuss a few of the many different processing approaches you can take to create cartoon style animation effects. There are also a lot of prebuilt factory PASeq presets that you can use to get started quickly creating cartoon animation image or movie processing effects.
When building up a PASeq for processing video you always want to have a paint strategy in mind. Paint Strategies are discussed in much more detail in the first part of this tutorial series, but the basic idea is to formulate the components of the visual effect style you are trying to achieve and then record action steps in your PASeq to implement the different steps necessary to build up the desired effect.
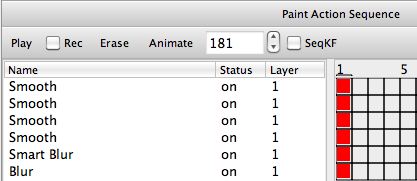
My initial thinking was that i wanted to generate a soft cartoon style that looked stylized but still retained a lot of the original source video characteristics. I used multiple applications of the Smooth image operation to generate this effect. The first Smooth action step processed the Source Image. The rest of the Smooth action steps process the Current Layer. The initial PASeq i constructed is shown below.

The Smart Blur ip op step was added for some additional edge smoothing. The Blur ip op step at the end is using an Edge 1 Composite setting and is actually a contrast boost sharpening step to boost the contrast and sharpness of the softening effect. The Simplify ip op is another processing effect that is very useful for generating soft cartoon styles.
The soft cartoon style animation i generated with the PASeq created above is shown below.
[vimeo]https://www.vimeo.com/8804685[/vimeo]
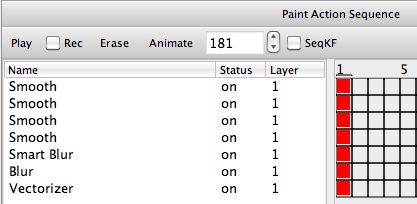
I liked the fact that the soft cartoon effect retained a lot of the source video characteristics. But after viewing it i wanted to try a more flat color cell animation cartoon style. To achieve this i used the Vectorizer to convert the soft cartoon canvas image into a flat color vector rendition. My modified PASeq with the additional vectorizer step is shown below.

I could have just run the vectorizer in a new single step PASeq by processing the original source image. But by processing a modified version of the source image i was able to achieve a more simplified flat color cartoon effect. Preprocessing your source footage to remove undesirable features or enhance desirable features prior to effect processing or painting is a useful tool to add to your paint strategy arsenal.
After viewing the flat color cartoon animation output i decided that i liked it better for this particular sequence than my initial concept of a soft cartoon rendition. I then thought it would be interesting to try adding some additional vector paint sketching on top of the flat color cartoon rendition.
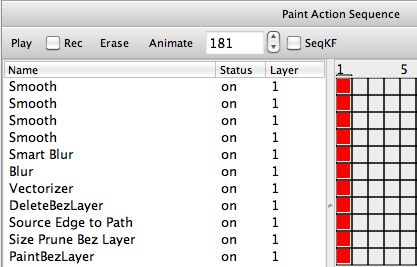
To achieve this i added the following action steps to my cartoon style PASeq. All of these steps were implemented by running different Path menu commands. First i erased the bezier path layer.

Then i generated a set of bezier paths derived from the source image edges.

Then i picked a thin vector stroke paint synthesizer preset. I used a Blend Composite setting with a low Blend % setting in the Paint Fill Apply control panel so that the vector sketch paint strokes i was adding would be more subtle when placed on top of the flat color cartoon canvas.
I then painted in the bezier path buffer using the vector paint preset i had just edited.

My final PAseq after recording the additional processing steps described above is shown below.

When i processed my source movie with this modified PASeq i generated the following cartoon style animation.
[vimeo]https://www.vimeo.com/8804798[/vimeo]
Additional Cartoon Styles
The Vectorizer is capable of a wide range of different flat color cartoon styles and effects. The cartoon example at the very top of this tutorial post was generated with a single vectorizer action step in a PASeq that processed the source image. A vectorizer Region Effect was used used to stylize the generated vector regions in that animation.
Studio Artist also allows for mix compositing when using the vectorizer so you can use repeated applications of the vectorizer with partial transparency to build up vector gradient effects that have some shading incorporated into them.
The Color Simplify image operation is also a very useful tool for generating cartoon styles. The cartoon style animation example below was generated using a single Color Simplify ip op action step in a PASeq.
[vimeo]https://www.vimeo.com/8826098[/vimeo]
Many cartoon styles incorporate some form of thin line sketch outlining in addition to rendering image mass with soft gradient or flat color areas. There are many different ways to generate thin outline sketch effects in Studio Artist. Some image processing options include the Color Edge, Color Simplify, Edge, Gradient, Smart Contrast, Sketch Edge, and Watershed Regionize ip ops. The Color Edge and Sketch Edge ip ops can also directly generate bezier paths that could then be painted in by the paint synthesizer. The paint synthesizer is also capable of a wide variety of different sketch paint effects by itself.
For More Information
This tutorial is the second part in a series of tutorials on movie processing strategies. The first part of the tutorial is available here. The second part of this tutorial series is available here.
The PASeq presets i described above are included in the new Movie Processing Strategies category. These PASeq presets showcase some features that work well for movie processing.
For some additional information on the mechanics of processing a movie file with a paint action sequence check out this tip.
The PASeq presets used in this movie processing tutorial series are available for download here.


2 Comments