Sequential Keyframe Recording is a feature available when working with Paint Action Sequences (PASeq) to generate hand painted animations or movies. Sequential Keyframe Recording can be used to help automate some of the repetitive and tedious issues associated with building up interpolated keyframe animation from a series of hand drawn sketches or paintings. This tip will discuss working with sequential keyframe recording in detail.
Building an animation sequence from hand drawn painting involves implementing a series of repetitive steps over and over. This process can get very tedious when you do it all manually. This is especially true when working with different paint presets for different stroke elements in the individual sketches, since you constantly have to switch between different paint presets while building up each individual frame in the animation.
Studio Artist provides some powerful tools and features to help you generate hand painted animations.
Keyframe Interpolation
One powerful feature Studio Artist offers is the ability to build up an animation from a series of interpolating keyframes. A paint stroke (or a collection of paint strokes) can be recorded as a single keyframe in a Paint Action Sequence (PASeq). Building a paint animation involves specifying the movement of individual paint strokes over time. You could do this manually by hand drawing each individual frame of an animation. And Studio Artist provides onion skin tools to aid your manual drawing by showing the contents of previous animation frames or your current source image on a transparent onion skin layer that can be used as a guide for hand drawing. But a much faster approach than hand drawing each individual output frame in the animation is to specify the animation as a series of interpolating keyframe views.
Each keyframe specifies the location and appearance of one or more paint strokes at a given time. Studio Artist will then automatically interpolate the appearance and positioning of paint strokes for the subsequent frames between 2 individual keyframes recorded in a PASeq. So rather than having to hand paint each individual frame, you can just hand paint keyframe views and then let Studio Artist generate all of the tween frames automatically. This can be a tremendous time saver when building up a hand painted animation sequence.
Keyframe interpolation also gives you the ability to interpolate the individual editable preset parameters associated with each paint stroke (color,brush size, brush texture, etc). We won’t really get into the details of that in this tip, but it’s something to be aware of since it can be used to give you an extreme amount of control over how an animation looks and evolves over time.
Sequential Keyframe Recording
When recording a series of individual hand drawn frame sketches (either keyframe sketches or individual frame images) there is a repetitive process involved in building up the individual frame images. Each individual paint stroke needs to be redrawn in it’s new location for each sketch.
The ordering of the individual paint strokes that builds up a frame also needs to be preserved across keyframes when working with keyframe interpolation. Interpolation takes place between individual keyframe cells recorded in the Paint Action Sequence timeline display. Each individual paint action step is a single vertical element in the PASeq list of action steps. Each paint action step in the list has an associated set of individual keyframe cells that are arranged horizontally in the PASeq keyframe timeline. The # of frame times for the keyframe cells displayed in the PASeq timeline is specified with a numeric max frame indicator control at the top of the PASeq palette (it shows 10 frames in the screensnap below).

There is one keyframe cell in the horizontal timeline for each frame in the output animation. Recorded keyframe cells are displayed with a red interior. Notice that each time you record a new action step in a PASeq a recorded keyframe cell is positioned at keyframe 1.
Individual keyframes can be recorded at frame times other than frame 1 by option clicking the appropriate keyframe cell. When a cell is option clicked, the contents of the current paint synthesizer parameters and the current source color are stored in the new recorded keyframe. If the action step is one associated with manual pen drawing, then the last path drawn is also stored in the recorded keyframe.
So you could manually build up individual keyframe sketches by hand drawing new paint strokes for each action step in the PASeq list followed by option clicking the appropriate keyframe cell in the timeline. As mentioned above, if the paint preset associated with individual action steps changes in any way as the list progresses, then you would need to reload the appropriate paint preset prior to drawing each new individual paint stroke before option clicking the appropriate keyframe cell.
Doing the repetitive option clicking and manual preset loading for each action step can quickly get tiring, plus it’s easy to mess up the potential preset ordering when manually loading paint presets for individual action steps as you are recording new keyframes. Sequential keyframe recording automates both of these processes for you.
A Simple Example
Here’s a simple example of working with sequential keyframe recording to build up a short animation example from 2 different facial sketches. The sketches will be made using 2 different source images as reference images for the sketches. The source onion skin feature was used to aid in constructing the sketches. The screen snap below shows the first simple facial sketch.
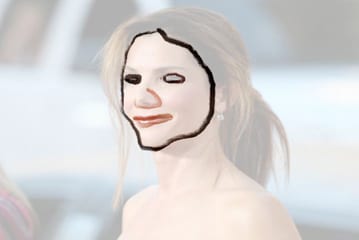
Note that the simple facial sketch is composed of 5 different hand drawn paint strokes. A PASeq was recorded to capture the hand drawing associated with this simple sketch. To do this, the record checkbox in the PASeq palettes was turned on, the canvas was erased to white, and the individual paint strokes were hand drawn. The resulting recorded PASeq action list is shown below.
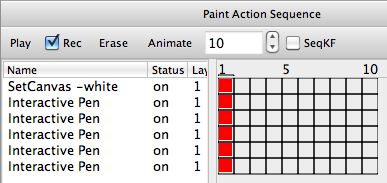
Note that after the initial SetCanvas-white action step there are 5 Interactive Pen action steps. These correspond to the individual manually drawn paint strokes used to build up the simple facial sketch. As an aid in generating further animation sketches, i renamed these action steps according to the facial feature they represented as shown below.
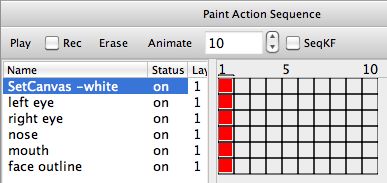
As mentioned above, it’s important when building up new keyframe sketches that the ordering of the individual paint strokes i preserved. This is necessary so that the appropriate interpolated movement of the individual paint strokes is generated in the final interpolated animation output. Appropriate naming of the individual paint strokes can be very useful as an aid to properly match up individual paint strokes for new keyframe recorded sketches.
We’re now ready to record a second keyframe sketch using sequential keyframe recording. To do this, turn on the rec checkbox as well as the SeqKF checkbox at the top of the PASeq palette. To record a new sequential keyframe sketch, you start by clicking the first keyframe cell at the appropriate keyframe time for the new sketch to be recorded at. For this simple example i recorded the keyframe cell for the SetCanvas -white action step at keyframe time 10 (the top right most cell in the timeline).
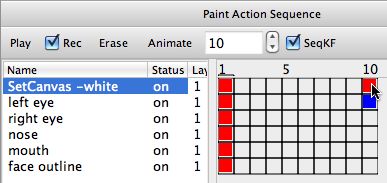
When i clicked on the initial keyframe cell at frame time 10 the setcanvas-white action step was run, the clicked keyframe cell turned red, and then the next keyframe cell at frame time 10 associated with the left eye paint stroke turned blue. The blue color means that that keyframe paint stroke is ready to be drawn. After the new paint stroke was drawn it is automatically recorded at the keyframe cell at frame 10,the color of the keyframe cell then turns to red to indicate it has been recorded, and the next keyframe cell at frame time 10 associated with the right eye turns blue, indicating it is ready to be drawn.
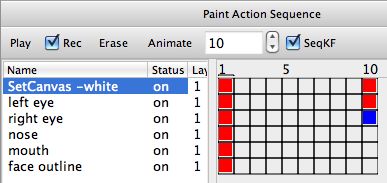
You can continue hand drawing the appropriate paint strokes for your sketch at frame time 10 until all of the vertical frame cells at frame time 10 have turned red. you can then turn off sequential keyframe recording by turning off the SeqKF and Rec checkboxes.
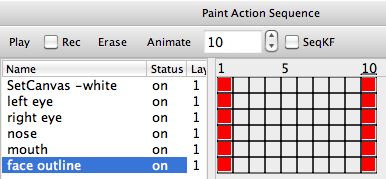
Note how sequential keyframe recording removed the drudgery from building up a series of keyframe recorded sketches. You can just click the first keyframe cell at the frame time you want to build up a new sketch at, and then concentrate on your drawing. When a cell turns blue (which means its ready to be drawn), Studio Artist automatically loads the appropriate paint preset for drawing that particular part of the sketch. So sequential keyframe recording automates the whole process of swapping paint presets for individually recorded paint strokes as well as automatically records the individual keyframes for the various hand drawn paint strokes that make up the sketch.
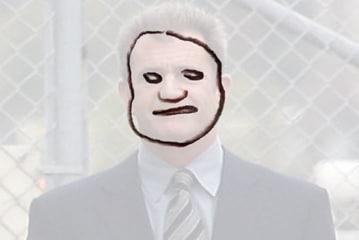
The second sketch used for this simple example is shown above (again with the source onion skin turned on that was used as a guide for building up the hand drawn sketch). Note that i used a different source image for the second sketch.
At this point i had generated a simple PASeq that consisted of a hand drawn sketch at frame time 1 and a second sketch at frame time 10. The 2 sketches were both composed of 5 individual paint strokes drawn on a white background. I then used the Action : Animate with Paint Action Sequence : to Movie menu command to generate a movie file of my simple animation example. The resulting output movie shown below is looped several times to show off the interpolated motion generated from the 2 hand drawn sketches recorded in the finished PASeq shown above.
[vimeo]https://www.vimeo.com/13110819[/vimeo]
The paint animation example above is extremely simple, and only shows off the use of 2 keyframes. The goal was to showcase a simple example to get across the mechanics of working with sequential keyframe recording. If you were generating a real hand painted animated movie you would probably use many more keyframe sketches than the 2 hand painted sketches we used in the example.
The second paint animation example below was generated using the same approach as discussed above. After the intial 11 action step PASeq was recorded, 9 additional keyframe sketches were recorded using sequential keyframe recording. Rather than space each keyframe sketch 15 frames apart, each keyframe sketch was initially recorded on adjacent frame times in a 10 frame timeline. The 10 frame timeline was then expanded to 135 frames using the Action : PASeq Timeline : TimeCompress/Expand menu command with a 15 frame expansion ratio.
[vimeo]https://www.vimeo.com/13114756[/vimeo]
Again, the goal of the sequential keyframe recording feature is to help automate some of the repetitive mechanical and housekeeping tasks required to build up manually painted animation recorded as a series of keyframes in a timeline. So you can concentrate on the task of physical drawing and let Studio Artist deal with recording your paint strokes as new keyframes and auto-loading any paint preset variations associated with your repetitive drawing.
For More Information
For an introduction to Paint Action Sequences check out this tip. This tip also shows off some additional simple examples of interpolating paint strokes using the PASeq timeline in addition to providing a general introduction to PASeq features.
The Studio Artist User Guide pdf chapter on Actions includes detailed information on sequential keyframe recording, the PASeq timeline, and PASeq features in general.
An alternative approach to building keyframe animations is to encapsulate bezier paths in a single paint action step. An advantage of this kind of animation approach is that you don’t need to worry about matching up paint strokes when initially constructing your sketches. You just generate a series of sketches, and then use PASeq Timeline menu commands after the fact to normalize stroke count and auto-associated neighboring paint strokes across keyframes to build smooth animations. For more information on this alternative approach to building a paint animation check out this tip.
An old Studio Artist 3.5 blog post that includes some simple examples of paint animations built using sequential keyframe recording and bezier encapsulation is available here.




1 Comment