The classic paint synthesizer was originally designed to draw with raster paint applied to vector paths. Some limited options for anti-aliased vector drawing that bypasses the traditional raster paint engine have been added to the v4 classic paint synthesizer. This post will explain the various vector and raster-vector hybrid drawing options in more depth.
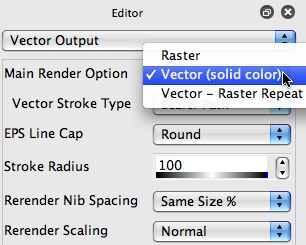
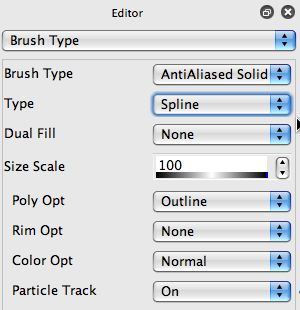
Currently in the v4 paint synthesizer there are 2 different approaches to drawing into the canvas with anti-aliased vectors. These 2 options are the ‘Vector (solid color)’ Main Render Option in the Vector Output control panel or the ‘AntiAliased Solid’ Brush Type.
Vector Output Render Options
The ‘Vector (solid color)’ main render option in the Vector Output control panel provides for anti-aliased drawing of vector lines or shapes into the raster paint canvas. It’s somewhat experimental and circumvents the normal paint synthesizer raster nib fill code, so consequently it does not support a lot of the paint synthesizer controls associated with paint nib fill.
So, you will be drawing with solid colored vectors that lack the organic complexity that can be achieved with the normal paint synthesizer Raster main render technique. Paint Fill Apply blend modulation is supported, but most of the other Paint Fill Setup and Paint FIll Apply controls will be ignored when in Vector (solid color) main render option. Similarly the Brush Source horizontal and vertical size controls are supported to setup a maximum brush size but most of the other Brush Source and the Brush Type controls are ignored.
The ‘Vector-Raster Repeat’ main render option can be used with a Path Application ‘Repeat Stroke’ setting greater than 1. The first application pass will be drawn with the Vector (solid color) main render option and then subsequent path application repeats will revert to the normal raster main render option for drawing. This allows you to create a hybrid paint preset that combines vector drawing with secondary raster paint effects. So you could draw with an anti-aliased vector stroke painting a solid color stroke that then spreads and melts with a secondary water stroke pass. This works because the vector drawing ignores many of the paint synth controls associated with brush generation and paint nib fill while they are all used during the repeat strokes that are using the raster main render option.
AntiAliased Solid Brush Type
The ‘AntiAliased Solid’ Brush Type also provides for anti-aliased drawing of vector paths. It’s somewhat more tightly integrated into the paint synthesizer than the vector render technique described above, but has a similar limitation in that many paint synthesizer controls will be ignored when using this brush type.
This is because vector drawing will fill with a solid color (or color gradient), so options like using the source image or the brush load module for filling don’t apply when doing vector painting. The AnitAliased Brush Type does provide for additional rim coloring, gradient shading and transparency functionality when painting. The Type parameter also allows for a range of different vector drawing styles. You can draw with vector shapes applied to the path (sphere, ellipse, blob, internal bezier path memory, text) or draw the complete path as a vector polygon or spline path.
The Dual Fill options also allow for hybrid paint presets to be constructed that combine vector drawing with additional raster paint effects in a single paint stroke. Full apply means that the vector path is drawn and then the normal raster paint engine overdraws using the same path. Mix Apply means that the 2nd algorithm only in a dual Mix Apply fill algorithm is used for the second raster engine paint pass. This provides an easy way to build hybrid vector-raster paint presets that first do vector drawing followed by wet or watery raster paint effects that soften or melt the solid color vector path.
Region as Brush Mode
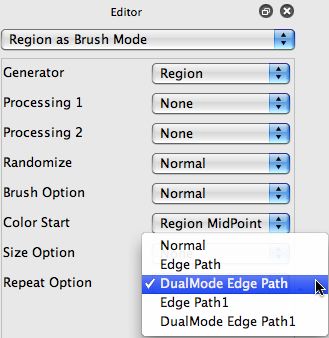
Both of the vector drawing options described above also work with region fill as brush pen modes. When used with these pen modes you can draw arbitrary shaped vector regions that then fill with solid color or color gradient fills.
The Region Fill as Brush pen mode also has a Repeat Option parameter that can be used in conjunction with the AntiAliased Solid dual fill feature. The repeat option provides a way to first fill in a solid region shape and then stroke the outline of the region with subsequent path applications. So you can use this feature with Dual Fill hybrid drawing so that the interior of the region is filled with vector drawing and then the outlines of the region are stroked with a raster paint preset. This is a very effective way to build watercolor style presets, since the interior or a region can be filled with solid color or a color gradient while the region outline can then be automatically blended with a water or wet paint preset during the second dual fill repeat pass.
Vector Output vs Raster Output
Studio Artist normally draws into a raster frame buffer. Each layer has it’s own associated raster frame buffer. So even if you are drawing with anti-aliased vectors that drawing is taking place into a raster frame buffer. If you save your canvas you are saving a raster image file. When you print using the normal File : Print menu you are printing from a raster frame buffer.
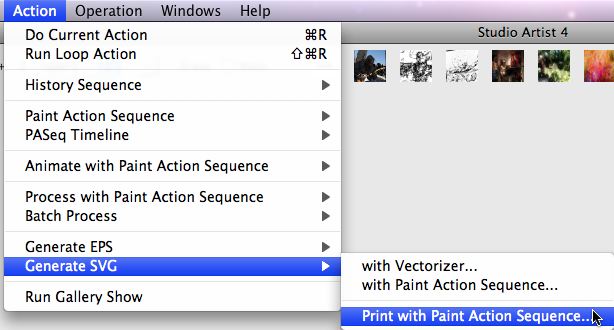
However, Studio Artist provides several different ways to output vector files as opposed to the normal raster image file output. You can output to EPS, SVG, or PDF vector formats. There are menu commands under the main Action menu to generate EPS or SVG from a paint action sequence. So you would record your paint steps in a PASeq and then run one of these menu commands to generate the appropriate vector file (or to print using the generated SVG vectors).
Since vector files are resolution independent, you can then import then into other programs like PhotoShop at extremely high resolutions. You can also print directly from the SVG vector rendering engine, which is a way to potentially take advantage of the resolution independence of vectors while printing to high resolution printers.
Here are 2 tips that discuss EPS and SVG vector generation in more detail. On the mac you can use Apple’s Preview application to read EPS or PDF files, and Preview can save an EPS file as a PDF file. If you want to generate PDF files check out the vector printing section of the SVG tip, which provides an alternative way to generate PDF files from the SVG render engine.
The SVG vector output functionality will mirror everything you see drawn on the screen, so you should use that as your first choice when generating vector files. If you want to take your vector drawing in Studio Artist and output it as a vector file then use SVG generation and output to SVG or to PDF (via the print from SVG functionality).
The EPS vector output functionality predates the SVG fucntionaliaty and may not exactly mirror what you see drawn on the screen. It does have features to try and convert raster paint strokes into vector output, so if you want to generate some kind of vector output from raster paint presets then EPS output would be the way to go.
Keep in mind that it’s extremely easy to generate vector files in Studio Artist with millions of internal vectors. Some external programs are better than others for dealing with files containing large numbers of vectors. For example, Illustrator can read SVG but we have found it often chokes on SVG files containing large number of internal vectors. It will typically do better if the same set of vectors is saved as a PDF file.


2 Comments