Studio Artist provides many different ways to generate or process movie files. Sometimes it might be desirable to hand paint or otherwise modify individual frames in a pre-existing movie file. This tip discusses how to use movie layers to do some hand paint touchup to an existing paint animation movie previously generated in Studio Artist by animating a Paint Action Sequence.
Movie layers provide a way to associate a Quicktime movie file with a specific Studio Artist layer. You can then work with individual frames in the movie layer like you would with any Studio Artist canvas layer, so you can paint, image process, warp, or otherwise manipulate the individual movie frames.
You can make a new movie layer or convert an existing layer to a movie layer (which will start by making a new movie file for the layer on your hard disk), or you can open a new movie layer from an existing movie file. All of these choices are available as menu commands in the Canvas : Movie Layer main menu.

In either of these cases the movie layer needs to be the same size dimensions as the existing layer stack.
You could also use the File : Import : Open Movie as New Canvas Layer menu command to close out the existing layer stack and start a new movie layer from an existing movie file. In this case the new movie layer will be sized to match the imported movie file. This would be equivalent to the old File : Open Canvas Movie menu command available in previous versions of Studio Artist.
To show off how you might use movie layers, we’re going to perform some hand painting on a simple paint animation generated in a previous tip on sequential keyframe recording. Here’s the paint animation generated at the end of this previous tip post.
[vimeo]https://www.vimeo.com/13114756[/vimeo]
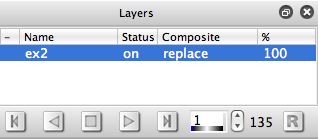
I wanted to augment this simple paint animation by performing some additional hand painting on top of the existing movie frames. I started by using the Canvas : Movie Layer : Open Movie as New Layer menu command to open the movie file associated with the paint animation shown above. This generated a second movie layer in the layer stack. I then deleted my original layer 1 so that i had one movie layer in the layer stack called ex2.

As shown above, a movie transport appears at the bottom of the layers palette when the current layer is a movie layer. You can use the movie transport controls to play the movie in the Studio Artist canvas. The up down arrows associated with the current frame display can be used to move forwards or backwards through individual frames one at a time.
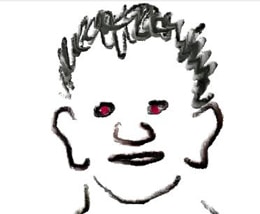
My goal for this simple demo was to hand paint in red dots to augment the existing painted eyes for each frame in my paint animation movie file. You could of course get much more elaborate about the kind of hand paint touchup and artistic effects you want to do when trying this out yourself. I set the source area to the fixed color picker and choose the shade of red i wanted to hand paint with. I then used a wacom pen to hand paint in 2 red dots in the center of each eye in frame 1.

After finishing my hand paint touchup for frame 1, i then needed to record the changes i made to frame 1. Any changes you make to a movie layer are not stored in the movie itself unless you explicitly record the changes. To do this you need to either press the R button (R stands for Record) in the movie layer transport, or run the Canvas : Movie Layer : Record to Existing Frame menu command.
If you don’t explicitly record any changes made to a frame image displayed in a movie layer, then if you change the current frame position and then change it back your frame editing changes will be gone. You can either record over the existing frame as discussed above, or you can insert a new frame after the current frame position (either by shift clicking the R button in the movie layer transport or by running the Canvas : Movie Layer : Insert as New Frame menu command).
I then used the up arrow control associated with the movie layer transport current frame display to advance to frame 2. I then painted in each eye with red paint, pressed the R button to record my changes to frame 2, then advanced to frame 3. I continued this process for all 135 frames in the paint animation movie file. The finished result with the hand painted changes is shown below.
[vimeo]https://www.vimeo.com/13137395[/vimeo]
At any point in time you can use the movie layer transport controls to play your edited movie layer to see if the resulting motion is what you want or not. You can always go back to frames you have already edited and modify them again if you wish to.
Once you are finished with your editing, it’s a good idea to output your edited movie file as a new flattened movie file. What the flattening step does is generate a new recompressed movie file that only contains frames used in the actual movie presentation.
Movie layer editing works behind the scenes by adding a new frame image to a Quicktime movie’s media track, and then adding a nonlinear edit to the Quicktime movie’s video track that references the new frame image in the media track at a particular frame time. Any new frames added to the media track are added as single uncompressed frames. So 2 things are going on when you make an edit to a movie layer. First, you are adding additional frame images and an associated nonlinear video edit to reference them at the frame in the video track they should be displayed at. Second, they are added as non-temporally compressed video frames. Flattening your edited movie file when you are done with your editing will recompress the entire movie frame by frame. So you end up with a new clean flattened movie file that is temporally compressed with no extraneous frames in it’s underlying media track.
For more Information
An Overview of Movie Layers is available here.
A tip on working with Movie Layers in Depth is available here.
The simple paint animation movie used as the starting point for the hand painting performed in this tip was generated in another tip post that discusses sequential keyframe recording.
We could have added two additional action steps to the PASeq used in this other tip post to generate the red eye coloring we manually painted above as a part of the initial paint sketches used for PASeq interpolation. An advantage of this alternate approach is that we would have only needed to paint in the red dots for the limited set of keyframe sketches generated in the sequential keyframe recording process ( as opposed to hand painting each individual frame like we did above).


