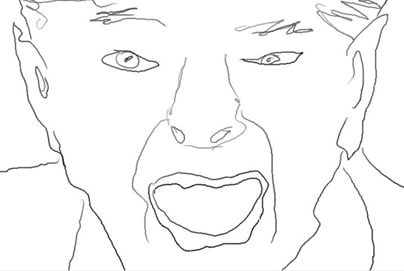
This tip discusses how to create a keyframed paint animation from a series of freely sketched pencil sketches. Each sketch can have an arbitrary number of pencil strokes. Each sketch is encapsulated into a single paint action step recorded in a Paint Action Sequence (PASeq). The final animation is generated by animating the keyframed single step PASeq into a movie file. By working with keyframes as opposed to hand drawing each frame in the animation you can generate a completed animation in a fraction of the time it would take to draw each frame manually.
Bezier encapsulation is a powerful feature of Studio Artist. Bezier paths are vector paths that underly each paint stroke in Studio Artist. Each layer contains a Bezier path frame in addition to a raster frame buffer. A set of multiple Bezier paths can be encapsulated into a single paint action step, and the bezier paths can then be keyframed in a PASeq timeline.
This tip will discuss how to generate keyframed animation from encapsulated bezier paths. One nice feature associated with encapsulated bezier paths is that an entire drawing composed of multiple paint strokes can be recorded into a single paint preset or paint action step in a PASeq. There are also PASeq Timeline menu commands that can manipulate encapsulated bezier paths so that a series of sketches made with arbitrary number of paths can be configured to smoothly animate over time.
Making your first sketch
The source onion skin is a useful feature that can be used as an aid when manually sketching a source image. I used a source onion for all of my keyframed sketches in this example.
To start, load the source image you want to use as your first sketch. Make sure the canvas is the size you want it to be for your animation. You can either do this by using the File : New Source and Canvas menu to load your source image and resize the canvas in one step, or you can use the Canvas : Resize Canvas menu.
Make sure the Canvas : Onion Skin is set to Source and then turn on the onion skin by either running the Canvas : Onion Skin : Toggle Onion Skin menu or running cmnd t which is it’s keyboard shortcut. You should see a semi-transparent view of the source image in your drawing canvas, this is the source onion skin.
Nw choose the paint preset you will be drawing with. I used the Default : Pencil : Round1 paint preset, which draws like a soft graphite pencil.
Make sure the paint preset you are working with does not have any path randomization. You can check this by going to the Path Randomize control panel in the Editor palette and making sure both Displace options are set to None. Path randomization interferes with the Bezier path conversion process, so you should avoid it if working with Bezier encapsulation.
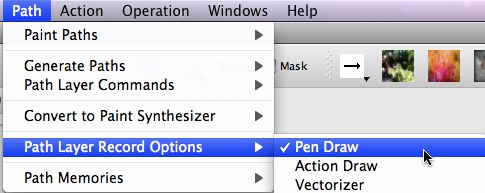
Since we want to record the bezier paths associated with our drawing, we need to make sure the Path : Path Layer Record Options : Pen Draw menu flag is turned on. When this menu flag is turned on then any manual drawing will be converted into Bezier paths and the paths will be stored in the current Bezier path frame.

Erase the canvas before drawing to white. You want to make sure you do a full erase, so make sure the default color is set to white and then shift click the erase button in the main operation toolbar. Shift clicking erase runs a full erase, which also erases the Bezier path frame for the layer in addition to erasing the raster frame buffer to the default background setting (white in this case).
Now draw a simple free sketch of the source image. Only what you draw will show up in the final sketch, the onion skin is there for a guide only. When you are finished sketching you can turn the onion skin off (run the Toggle Onion Skin menu discussed above).
To verify the Bezier paths associate with your drawing were recorded into the Bezier path frame switch to Bezier operation mode. You should see the paths appear on top of your sketch strokes. A shortcut to drop into and out of Bezier operation mode is to use the cmnd 5 keyboard shortcut.
Switch back to paint synthesizer operation mode. make sure you haven’t changed the paint synthesizer from the preset you were using for your sketch drawing. We’re now ready to encapsulate the recorded Bezier path frame into a single pain action step.
Bezier Encapsulation
To encapsulate the recorded Bezier paths in the Bezier path frame into the current paint synthesizer preset, you run the Path : Convert to Paint Synthesizer : as AutoDraw Embedded Bezier Frame menu.

This menu command captures the contents of the current Bezier path frame into the internal Bezier memory in the paint synthesizer. It also runs a paint synthesizer macro edit that configures it’s editable parameters so that it will play back the paths stored in it’s internal path memory.
Now we’re ready to record the encapsulated paint preset in a Paint Action Sequence. Open the PASeq palette and erase it’s contents by pressing the erase button in the toolbar at the top of the PASeq palette. Turn on recording by checking the record checkbox in that same toolbar. Then press the action button. The encapsulated paint step should now playback your sketch and a single paint action step should record in the PASeq. Turn off PASeq recording by unchecking the record checkbox.
Recording the remaining keyframes
You can now record the remaining keyframes associated with your sketch animation. You will perform the following cycle of steps for each remaining keyframe.
- open a new source image
- turn on the onion skin
- perform a full erase of the canvas
- draw you sketch
- switch to bezier operation mode
- option click a PASeq keyframe cell to record the keyframe
I prefer to record adjacent keyframes, and then use the Action : PASeq Timeline : Time Compress/Expand menu command to expand the timeline when i have finished recording all my keyframes.
Generating an animation movie from your recorded keyframes
Since i wanted to have the PASeq erase the canvas first for each frame and then draw the sketch, i recorded a second PASeq action step that sets the background to white. I did this by turning on PASe recording, pressing the erase button, turning off PASeq recording, and dragging the recorded Set Canvas- White action step to the top of the list.
The screen snap below shows my finished PASeq for the animation. I recorded 4 keyframes associated with 4 sketches. I wanted to have 10 frames between each keyframe, which leads to a total of 31 frames in the animation, since keyframes are recorded at frames 1,11,21,31.

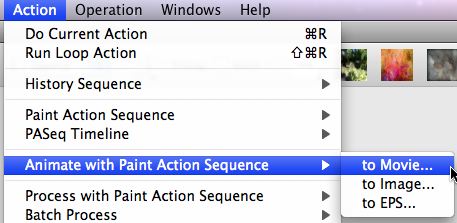
At this point you can generate an animation movie from your recorded PASeq. To do this you run the Action : Animate with Paint Action Sequence : to Movie menu. This menu will ask you to name the generated movie file and will then run the animation rendering the frames out to that movie file.

If you just want to preview the animation without rendering it to a movie file you can just press the Animate button in the PASeq toolbar. You can always use the spacebar to stop an animation or a rendering movie process.
If you now watch the generated animation movie you will notice a few problems associated with it. The animation between keyframes will not appear to be smooth, and there will be abrupt jumps at keyframe points where paint strokes jump into or out of existance.
There are 2 reasons for the problems associated with the animation. The first is that each keyframe was recorded with an arbitrary number of sketch strokes. But to have a smooth animation we would want to have the same number of paint strokes for each sketch. The second reason is that the stroke transitions between keyframes are totally arbitrary, when ideally we would want spatially adjacent paint strokes in adjacent keyframe times to interpolate.
The solution to both of these problems is to run some Action : PASeq Timeline menu commands on our recorded PASeq prior to rendering out the final animation. The first menu to run is the Action : PASeq Timeline : Embedded Bezier Frame : Normalize Split menu. Both normalize command options insure that each keyframe in the PASeq timeline has the same number of embedded bezier paths. Normalize Split splits the longest paths to normalize the path count. Normalize Recycle duplicates paths.

The second menu command to run is the Action : PASeq Timeline : Embedded Bezier Frame : Reorder Minimal Distance menu command. This menu command reorders the path indexes of the recorded paths to insure that the interpolated paths are spatially adjacent, which leads to a smoother animation. This second menu command may be slow to run if you have a large number of embedded Bezier paths or a large number of keyframes.
3 movie examples are shown below. The first is the original keyframed animation. The second is the split normalized animation. The third is the reordered by minimal distance animation.
minimal distance reordered animation
Watching each of these 3 animations should give you a feel for what the various processing steps do.
If you want to create even smoother animation, you can break your sketch up into parts and record each part as a separate PASeq action step. Each of the action steps will have associated keyframed encapsulated Bezier paths. For a face ketch, you could break the sketch up into action steps for each of the facial components (eyes, nose, mouth, hair). Building the sketch this way insure that the keyframe interpolation will only be associated with the transformation of each facial part and not transforming between parts, leading to smoother automatic motion of the component paint strokes.
You can also generate alternative keyframed Bezier animations based on various automatic path generation operations, like generating the sketch paths from the source edges. One advantage of this kind of approach is that there’s no manual drawing, the entire process used to generate the animation is fully automatic. There’s a tip that describes how to do this in more detail.


4 Comments