Someone asked about how to create a PASeq action step that could zoom the canvas in or out in a controlled fashion. You could of course use the Scale Uniform Interactive Warp to do this. Another approach is to build a MSG preset that scales the canvas. This is an extremely simple MSG preset to construct and we’ll detail how to build it here.
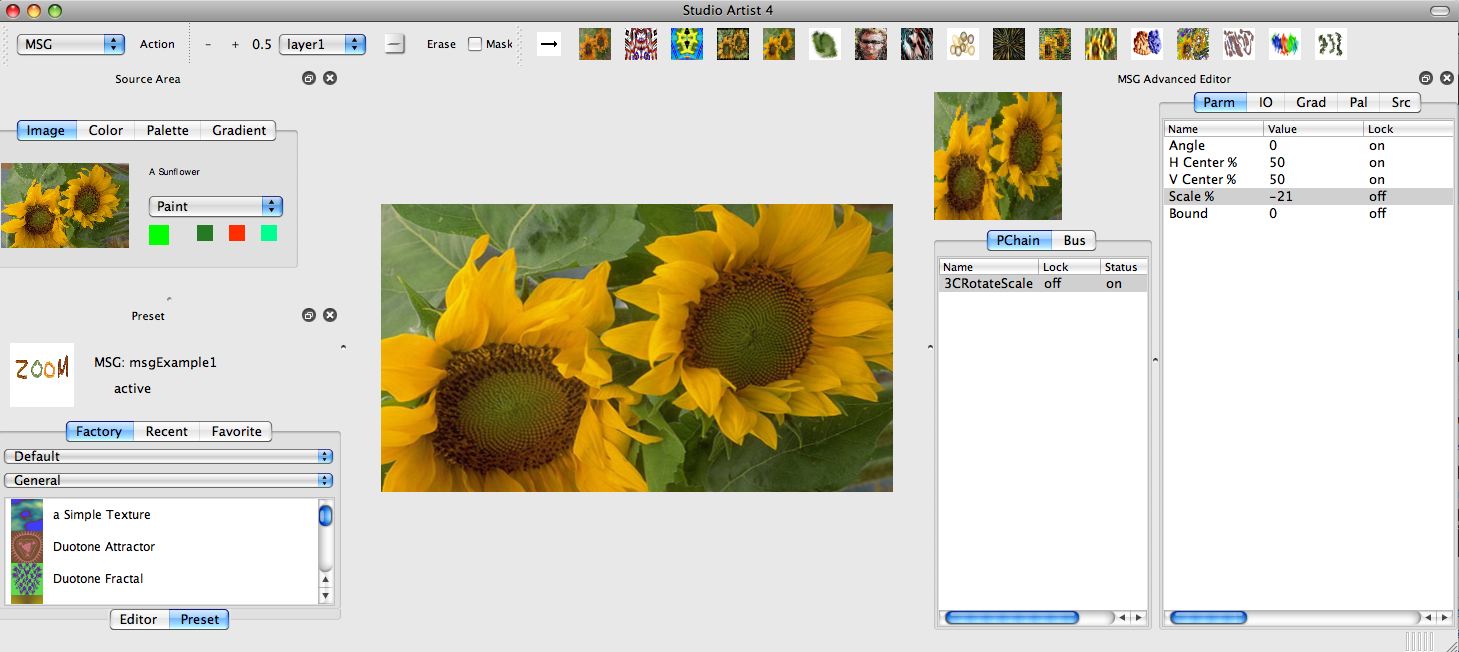
If the MSG Advanced Editor is not currently up in the interface use the Window : MSG Advanced Editor menu to bring it onto the screen. I have configured one of my custom workspace memories for MSG Editing so it’s easy for me to use the menu command key to switch my workspace on the fly for MSG Editing as shown above.
Make sure the Processor Chain (PChain) tab on the bottom left editing list is active. Empty out the processor chain list by selecting the existing processors one by one and pressing the delete key to delete them.
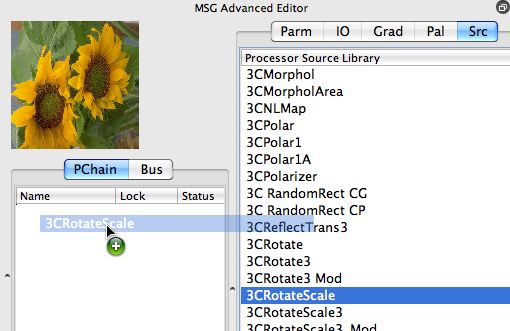
Now you need to construct your new MSG scaling preset. You can do this by adding one 3CRotateScale processor to the Processor Chain list. To do this, select the Source (Src) tab for the right side list in the MSg Advanced Editor. This will bring up the processor source library when the Processor Chain is active on the left side. Scroll the processor source list until you get to the 3CRoateScale processor. You can also type characters when the list is active to automatically scroll the alphabetical processor list to the processor starting with the characters you typed. Select this processor and drag and drop it over to the Processor Chain list. You should now see 1 3CRotateScale processor in the processor chain editor.
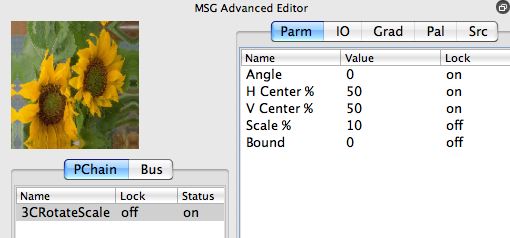
Select the 3CRotateScale processor in the Processor Chain Editor. Then select the Parameter (Parm) tab in the context sensitive right side editing area. This will bring up the editable parameters for the processor you selected. This particular processor can scale and rotate an image. Since we are only interesting in scaling and not rotating we want to make sure the Angle parameter stays set to 0. I locked this parameter as well as the H and V Center parameters to insure this would be the case. The Scale parameter is what will define the zoom in or out. Make it negative to zoom in, positive to zoom out. The Bound parameter determines whether the borders reflect or tile or do nothing when scaling out.
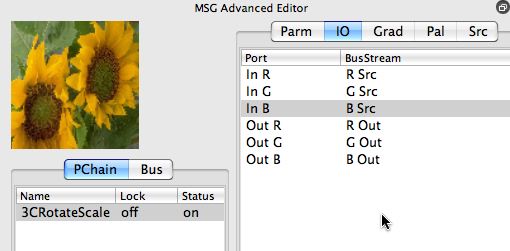
Now select the IO tab in the context sensitive right side editing area. This will bring up the IO (input-out) connections. You need to set these up properly so that the processor takes the Src image Streams as inputs and the Out image Streams as outputs.
The screen snap above shows the correct assignments for the Bus Streams for the various IO Ports for the selected processor. If your IO connections are different, you will need to adjust the Bus Stream connections for the various Ports to match the configuration shown above. This configuration takes the RGB Src streams as inputs for the processor and uses the RGB Out Streams for the output from the processor.
If you don’t match up the color stream correctly (placing a B Src for the In R port for example), then the output image coloring will not be correct. You can try this to see the effect if you wish. Another potential problem would be to connect the Out Steams to the In Ports. Try this if you want and you will see the result of a recursive IO connection for a geometric distortion processor type (useful for special effects sometimes but technically incorrect)
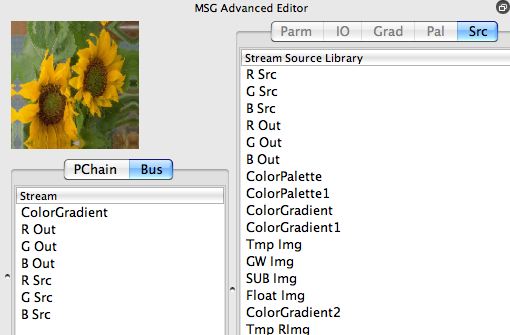
Depending on the current state of the Bus when you started editing this preset, you may be missing the Src streams. If this is the case, you can edit the Bus to add them prior to adjusting the processors IO connections. To do this, you would select the Bus tab for the lift side list. You would then select the Source (Src) tab for the context sensitive right side area. This would bring up the Stream source library. You could then drag the individual Src streams (R Src, G Src, B Src) from the stream source library to the Bus list.
You will notice that when i checked the current Bus list when putting together this example i had an additional ColorGradient stream in my MSG Bus list. I didn’t need to include this additional Stream since it’s not used in the preset i built. But it doesn’t cause any problems to have it there. Since it’s not connected to any of the processors in the Processor Chain (just 1 processor in this particular example) it’s just ignored when the preset is run.
There’s one more thing you should check when building or using a MSG preset. All of the controls associated with building a MSg preset are in the MSG Advanced Editor. But how the MSG preset interacts with the current source and canvas in Studio Artist is controlled in the normal generic Editor palette. So you will need to go to the generic Editor palette when in MSG operation mode and make any adjustments there depending on how you want to use the MSG preset. You can always use the Operation : MSG ; MSG generic menu if you are unclear on how to switch the operation mode to MSG and bring up the generic Editor in the interface.
Looking at the screen snap of the Editor settings above we can see that the MSG Preset’s IP Source is using the Source Image as the source for the MSG processing. If you wanted to process the existing canvas image instead you could switch the Ip Source parameter to Current Layer. You also have additional parameter options for Mix and Compositing the effect into the existing canvas. These controls mirror the standard compositing functionality you see in other Studio Artist operation modes like image processing or the texture synthesizer.
When you export a MSG preset the generic MSg parameters shown in the generic Editor palette above are stored in the preset file in addition to the advanced MSG parameters that define the modular architecture of the MSG preset.

