This tutorial continues our discussion of the mechanics of designing and building paint strategies for creating paint animation effects in Studio Artist.
Studio Artist uses Paint Action Sequences (PASeq) to process movies. So to implement your paint strategy for building a particular paint animation effect you need to record a series of action steps in a PASeq that work together to build the particular processing effect you are trying to create. Designing an effective paint strategy and associated PASeq processing preset is often an iterative process.
Here’s an example of a finished paint animation processing effect. What i like about this example is that i started out with an initial design goal, but in the process of implementing it and watching the end result i was inspired to move in a slightly different direction for what ended up being my final paint animation.
[vimeo]https://www.vimeo.com/8800861[/vimeo]
The examples below give some insight into the design process that went into creating the animation above. My initial design goal was fairly straight forward. I wanted to create a simple paint animation effect using a single wet paint preset. I used multiple applications of the wet paint preset with reduced brush size for each auto paint iteration to first rough in the image and then build detail in the painting in the later passes as the brush size gets smaller.
The PASeq below shows my initial design attempt.
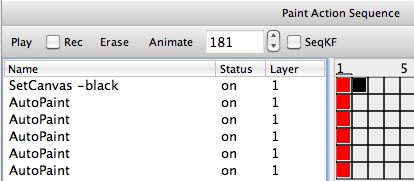
I started off by erasing the canvas to black. I option m clicked keyframe 2 for this first action step to record a black mute keyframe. Doing this insures that this first action step only plays back for the first frame in the animation. I did this because i wanted to overdraw on the previous output frame for all frames except the first frame of the animation.
I then recorded 5 auto paint passes using the same wet paint preset. For each pass i reduced the brush size by adjusting the Max Size Range control in the Brush Modulation control panel of the paint synthesizer. Reducing the brush size over time is a typical paint strategy to build detail in a painting.
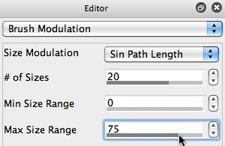
The paint animation generated from this first simple PASeq is show below.
[vimeo]https://www.vimeo.com/8801902[/vimeo]
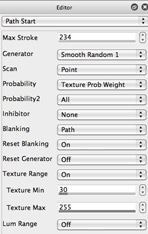
After watching this initial paint animation i decided that i wanted to change my initial design goals for the animation. I decided that my initial strategy of overpainting the entire video frame resulted in an animation that was a little more frenetic than i wanted. So i edited the individual auto paint action steps so that they focused on starting paint strokes in high textured areas of the source video only.
I did this by making some simple edits in the Path Start control panel of the paint synthesizer shown below. I set the Probability option there to Texture Prob Weight. And i turned on the Texture Range control and set the Texture Min to 30 and the Texture Max to 255. These editing changes in sure that the paint preset will only start a paint path in a high texture or edge area of the source video.
I also wanted to modify the previous output frame prior to painting on top of it. I wanted my previous paint strokes to soften and dissipate over time in the animation. I added a Smart Blur image operation action step to my PAseq to achieve this goal. I used the Polar variation setting to achieve a stylized polar blur of the painted background over time in the animation.
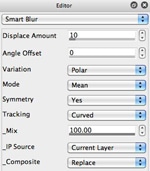
Note that i dragged the SmartBlur action step to the top of the PAseq list shown below so that it processes the previous output frame prior to the auto paint steps painting on top of the processed previous frame. This PAseq overdraws on top of the previous output frame because we don’t erase the canvas except when processing the initial first frame of the animation.
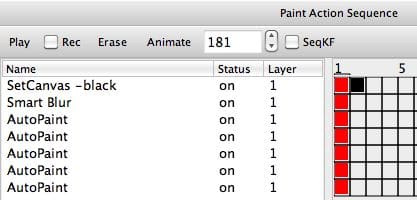
The paint animation that results from processing my source movie with the modified PAseq above is shown below.
[vimeo]https://www.vimeo.com/8801921[/vimeo]
Note that the visual appearance of this second paint animation is very different than my first attempt at building the effect. Visual flicker has been reduced, and the painting now takes place in the foreground on top of a dissipating blurred painted backdrop.
After watching this second attempt at creating my effect i noticed that i actually liked the look of the larger brush size paint steps more than the final painted appearance after the small detail generating brush steps. Adding detail made the painting more recognizable but gave it a somewhat flatter visual appearance for this particular paint preset. So i removed the last 3 Auto paint action steps from my PASeq.
I liked this new paint look achieved from using fewer paint steps with larger brush sizes. But i still wanted to add more emphasis on the features present in the original source video. I used 2 different techniques to boost the source features in the painted canvas. I first used the Equalizer ip op to generate a high spatial frequency representation of the source image. I set the ip op Composite control to Replace Region Selection. I did this so that the output of the Equalizer ip op was routed to the current layer’s selection buffer rather than added to the canvas.
I then used the Selection Modulate Rotate interactive warp to slightly warp the painted canvas. This warp is adaptively modulated based on the contents of the current selection buffer. It’s an interesting technique that can be used to add spatial feature detail to an abstract image or painting.
I then used the Edge ip op to add some additional source edge modulated sharpening to the painted canvas. Note from the Edge ip op control panel settings below that i’m using the Source Image as the input to an Edge Strength Coloring effect that is then add scaled composited into the painted canvas. Doing this adds additional source video feature detail to the painting.
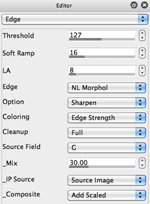
The resulting PASeq with these editing changes is shown below.
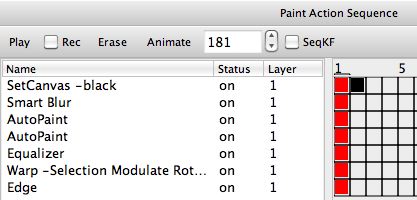
This final PASeq implements the following paint strategy. It starts by erasing the first frame only of the animation to black. Then the contents of the canvas (the previous output frame) are then blurred. Two auto paint steps then paint in the features of the source video frame. I then generate a high frequency representation of the source image, place it in the selection buffer, and then warp the painted canvas using the selection buffer to modulate the warp. I then boost the source frame edge features in the painted canvas.
The resulting paint animation generated from this final PASeq design iteration is shown below
[vimeo]https://www.vimeo.com/8801988[/vimeo]
What i like about this particular example is that it shows how your initial design goals can sometimes change as a part of the overall design process based on the visual feedback you get from viewing your initial attempts at constructing an animation. By going with the flow and trying out different ideas as a part of my design process i was able to move in some different directions and end up with a more interesting animation than what i initially set out to create.
For More Information
This tutorial is the second part in a series of tutorials on movie processing strategies. The first part of the tutorials is available here. The third part of the tutorials is available here.
The PASeq presets i described above are included in the new Movie Processing Strategies category. These PASeq presets showcase some additional version 4 features that work well for movie processing.
For some additional information on the mechanics of processing a movie file with a paint action sequence check out this tip.
The trick i described above for adding source features to an abstract image or painting is described in more detail in this following tutorial.
The PASeq presets used in this movie processing tutorial series are available for download here.


2 Comments