Studio Artist uses Paint Action Sequences to process QuickTime movie files. We have discussed the mechanics of working with Paint Action Sequences in previous tutorials and the User Guide. This tutorial is a more advanced look at different strategies to keep in mind when constructing Paint Action Sequences to process movie files.All of the processing scripts mentioned in this tutorial are available as Paint Action Sequence Presets. PASeq is the shortcut abbreviation for Paint Action Sequence.
Overview
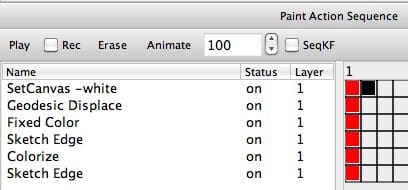
Movie Processing in Studio Artist is achieved by building a processing script called a Paint Action Sequence (PASeq) and then processing a video file with the PASeq to generate a new effect rendered output movie. The individual action steps recorded in the PASeq work together to build up a particular artistic effect. The Paint Action Sequence palette shown above is accessible from the main Windows menu and is where you record and edit a PASeq.
You can open a source movie in Studio Artist’s source area and work with a single frame of your source movie to build and record a PASeq. When PASeq recording is turned on any processing actions (manual or automatic) you perform in Studio Artist will be recorded as individual action steps in the PASeq. When finished recording you PASeq, you can then run one of the Action menus to process a movie file (or folder of numbered frame images) with the PASeq to render out your new processed output movie file.
For more information on recording custom paint action sequence and processing a movie file with it check out this tip.
Building a Paint Strategy
Every successful paint action sequence is built up from implementing some kind of paint strategy. A paint strategy can be thought of as the set of steps necessary to build up a particular visual effect. An artist always follows some kind of a strategy or plan to build up an artistic image. The combination of all of the steps in the strategy act together to generate the desired visual effect.
When processing video there are additional perceptual factors to take into account besides the artistic appearance of a single image. A video is composed of a series of frame images presented sequentially over time. When processing a series of video frames you need to be aware of how any image processing or painting you are doing is going to look when the processed video frames are sequentially presented to a viewer as the rendered video file plays back.
One important part of any paint animation sequence involves what to do with the animating canvas background. There are several different approaches to this component of a paint strategy for building a paint animation. The traditional thing to do would be to erase the background of the canvas to white before drawing each frame. This simulates traditional paint or sketch animation where the animator always draws on a clean piece of paper.
A visual side effect of erasing the background each frame is that the resulting animations usually have a perceived flicker. This is especially true when an animation is built up from generic autopainting within Studio Artist. There may not be any real visual continuity between paint strokes from frame to frame when autopainting with some arbitrary paint synthesizer preset. If there is lack of temporal continuity from painted frame to frame then that results in perceived flicker in the processed output movie when you watch it.
The paint strategy you will follow when building your paint action sequence depends on what you are trying to achieve stylistically in a given animation. If you want it to look like it was hand drawn animation, then a style with some visual flicker from frame to frame might be just what you want. If you don’t, then there are various strategies to use to eliminate flicker in a paint animation.
Eliminating flicker involves introducing some form of temporal continuity from frame to frame. By temporal continuity we mean that there is some visual coherence between sequential frame images in the output movie. One approach to generating temporal continuity in an animation is to modify or transform the previously painted output frame in some fashion, and then paint on top of the modified canvas.
Making sure that individual paint strokes have continuity from frame to frame is important for generating temporal continuity. Painting on top of the previous output frame is one way of doing this. But you could also use other techniques like time particles or bezier path interpolation to build paint stroke continuity from frame to frame in an animation.
Building paint paths from source frame features (like edges) is also an approach that can work well for reduced flicker in paint animation. This is because paint strokes that track the edges in the source video frames will track the object movement taking place in the video over time. A technique like this can be used in conjunction with overdrawing on a modified previous output frame image to reduce or eliminate flicker.
Many Studio Artist paint presets also incorporate various kinds of randomization to help achieve a more organic paint look. This can take the form of color randomization as well as modulation of different characteristics of the paint paths and brush over the drawing of a single paint stroke as well as over the course of drawing multiple paint strokes. Sometimes you need to dial back or eliminate artistic randomization effects in a paint preset when processing video to avoid introducing temporal variance from frame to frame.
Typically you will be working with source video that is 24 or 30 frames a second. But traditional animation is often generated at a lower frame rate. Reducing the frame rate of an animated output sequence (like to 10 – 15 fps) is another great way to reduce the visual perception of flicker. Studio Artist has movie preferences you can use to automatically skip source frames when processing with a PASeq if you want to reduce the output frame rate without stretching out the timing of the resulting animated movie.
Another key point is that often a successful paint strategy and it’s associated paint action sequence can be a combination of paint effects and image processing effects. One of the strengths of Studio Artist is that you can combine together different paint effects, image processing effects, warping or morphing effects, region masking, and resolution independent texture synthesis within a given paint Action Sequence script. Most successful animations are based on scripts involving several different paint or image processing presets that work together to build the particular desired effect.
Wet Flow Paint Animation Example
Here’s an example of a simple paint animation effect i put together to showcase some of the principals of building a paint strategy as discussed above. The PASeq incorporates overdrawing on a modified previously painted canvas (as opposed to erasing the canvas at the beginning of each new frame). I was trying to achieve a rough fairly abstract paint style with some liquid flow in the background. I also didn’t want the painting to be so abstract that you couldn’t distinguish what the original source content was.
[vimeo]https://www.vimeo.com/8787425[/vimeo]
The video example above shows off the end result of my iterative design process to build the desired paint animation style i described above.
I started by choosing a rough paint preset that focuses on laying down paint in high texture regions of the source image. I then recorded four paint passes using this preset with progressively smaller brush size for each pass. My initial PASeq (shown below) also erased the canvas to white before painting each frame.
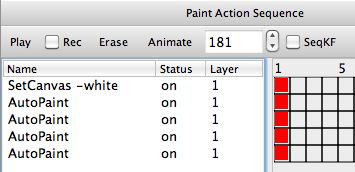
The video example belows shows what you get when you process the skater source video with this initial PASeq.
[vimeo]https://www.vimeo.com/8787656[/vimeo]
Because the canvas is first erased to white for each frame prior to painting it in there’s a fair amount of visual flicker associated with the paint animation.
My next attempt at modifying this initial PASeq was the one shown below. A black mute keyframe was inserted at frame 2 of the first Set Canvas – White action step in the PASeq list. You hold down the m hotkey while option clicking a keyframe to record a black mute keyframe. I then choose a radial flow canvas spreader paint preset and used it to spread the paint strokes on the canvas out from the center towards the edges. After recording this additional paint step into the PAseq i then dragged it at the top of the PASeq list right after the initial set canvas to white action step that only runs for the first frame of the animation.
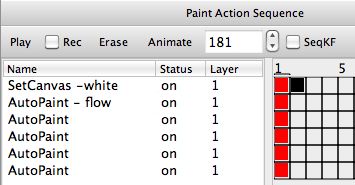
So this PASeq erases the canvas to white for the first frame only. The canvas is then spread out by the flow paint, and then the original paint steps that draw in the skater take place. Since the canvas is not erased except at frame 0 the previous output frame will always be in the canvas when the next frame starts drawing. The video example belows shows what you get when you process the skater source video with this second PASeq.
[vimeo]https://www.vimeo.com/8787699[/vimeo]
I liked the fact that overdrawing on top of the flow modified previous output frames reduced the visual perception of flicker in the resulting paint animation. But i felt that the foreground of the moving skater was a little hard to distinguish from the smeared paint background. So, i introduced an additional processing step that modified the previous output frame by slightly hue shifting it. The modified PASeq with the addition of a HueShift image operation action step is shown below.
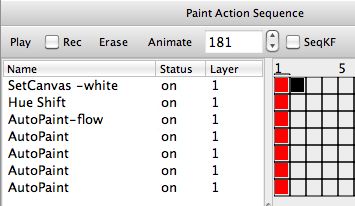
The video example belows shows what you get when you process the skater source video with this third PASeq. Note how the addition of the hue shift step helps to distinguish the foreground from the background.
[vimeo]https://www.vimeo.com/8787741[/vimeo]
At this point in designing my paint strategy i wanted to make the source video features a little more recognizable in the paint animation. And i wanted to reduce the emphasis of the flowing smeared background a little and increase focus on the foreground painting. I also decided to start with a black background instead of a white background. My final PASeq for my iteratively designed paint strategy is shown below.
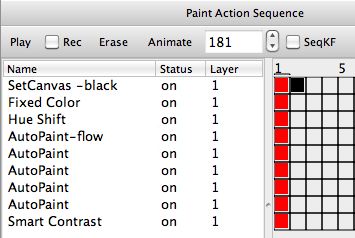
Once again, here’s the final paint animation video below generated with the final PASeq shown above.
[vimeo]https://www.vimeo.com/8787761[/vimeo]
Note how i worked iteratively to build my final paint strategy. I took my initial goals and worked to build my paint action sequence step by step to achieve those goals. This is usually a more effective way to work than trying to do everything in a single pass, especially when just getting started with Studio Artist. As an experienced Studio Artist user i find that i still modify and tweak my initial PASeq designs to hone a particular effect and to fine tune it to the characteristics of my source video.
Being organized and focused on building the different components of your desired paint strategy step by step is the best way to build your own custom paint animation effects. Don’t be afraid to experiment. You can always delete a recorded PASeq action step if you’re not happy with what it’s doing. You can also export PASeq presets as you’re working, so that you can go back to a particular iteration of the effect if you get off track in your design process.
Getting Started
Studio Artist comes with thousands of different paint synthesizer and PASeq presets to get you started. They are arranged in different Collections and Categories. All of the presets are completely editable, so you can modify them or build your own. If you don’t want to build your own, you can use the ones we provide to get started. If you want to build your own, there are an unlimited number of presets that can be generated within the program by custom editing your own presets.
Combining together different paint presets and image processing effects within a paint action sequence is how you build up a particular paint strategy. Don’t be afraid to experiment. Often it’s best to start out fairly simple and then add additional action steps one at a time to build a more sophisticated effect.
Where to go from here
We have provided a tutorial folder of specific paint action sequence presets in the Process Movie Tutorial category designed to show off a series of different simple paint strategies. The Process Movie Tutorial pdf helps explain how these different PASeq presets were built. This particular set of tutorial PASeq presets is a little old but still useful for getting started with building PASeqs for movie processing.
The presets i described above are included in the newer Movie Processing Strategies category. These PASeq presets showcase some additional version 4 features that work well for movie processing.
For some additional information on the mechanics of processing a movie file with a paint action sequence check out this tip.
This tutorial is the first part of a series of tutorials on building paint strategies for processing movies. The second part of the tutorials is available here. The third part of the tutorials is available here.
The PASeq presets used in this movie processing tutorial series are available for download here.


4 Comments